Updated: 7/23/22
Key Points: This article is a monster so I’ve included the main points to getting out of hip pain below:
- Modify training and lifestyle activities to allow the irritated hip to calm down
- Eliminate aggravating lifestyle activities like sitting
- Modify deep squats, sumo deadlifts and full olympic lifts to other non-painful movements temporarily
- Identify and correct mobility limitations in the ankle, shoulders and thoracic spine to reduce stress on the hip
- Identify the proper squat stance for your unique hip anatomy
- Correct technique issues in the squat, deadlift and olympic lifts
- Maintain a neutral spine position during lifts
- Start gradually loading the hip through a progressive strengthening program
- Emphasizing progressively more challenging squat and deadlift motions
- Targeting the hip and core musculature
What is Hip Pain and Femoral Acetabular Impingement Syndrome (FAIs)?
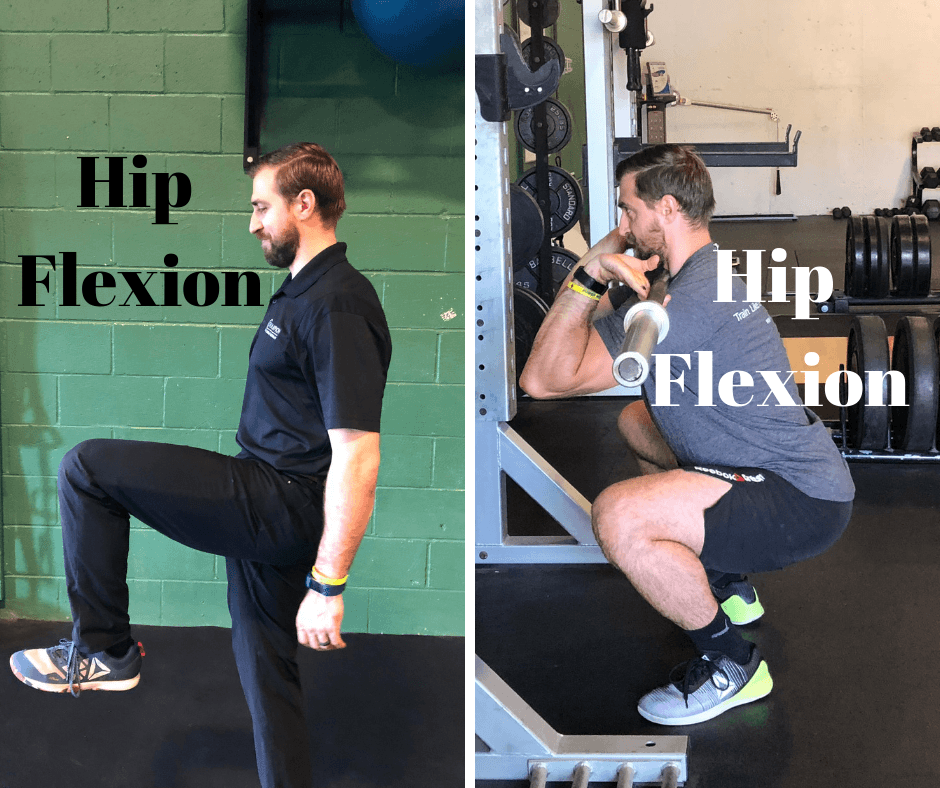
“I’ve got a painful, pinching sensation in the front of my hip that hurts in the bottom part of the squat.”
Sound familiar? Maybe it starts with a little tightness in the front of the hip after a hard squat session. Perhaps it’s also a little tight in the groin. The obvious conclusion is that the hip flexors are tight and you end up stretching the front of the hip out in hopes of fixing the issue.

Over the course of time it just gets worse. The tightness in the front of the hip becomes a sharp pain. Squatting and olympic lifts go from your favorite lifts to the most frustrating movements in the gym. This is a terrible situation…
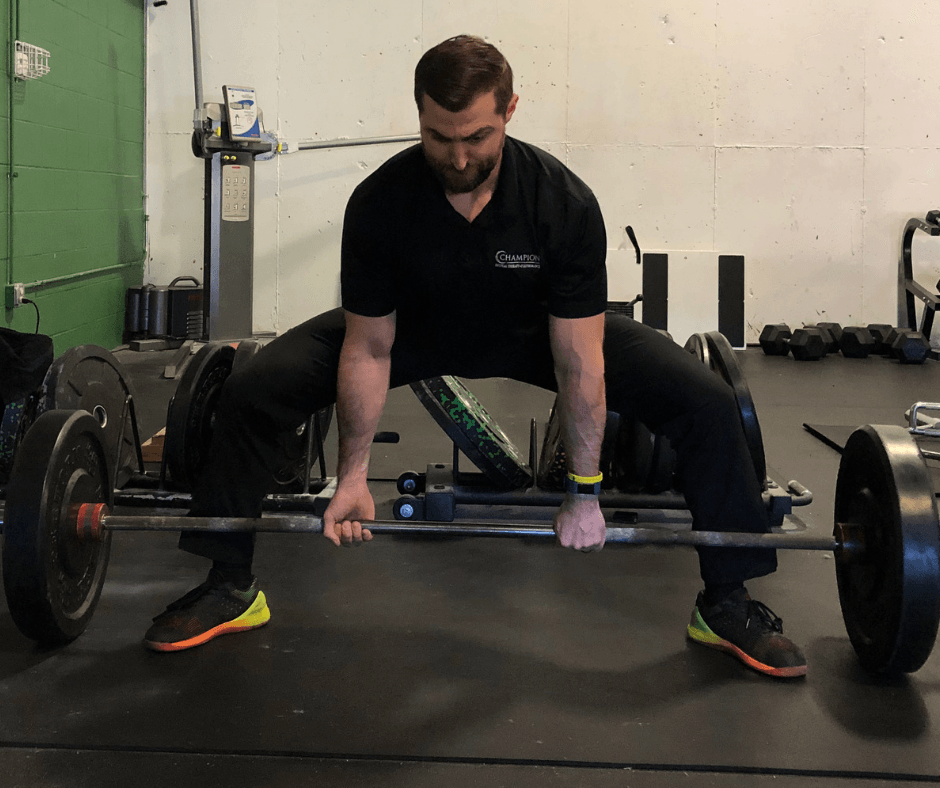
The same situation can occur with sumo deadlifts. It can be either at the set-up of the deadlift or at the lockout. What starts out as some soreness in front of the hip can quickly evolve into something worse. So what gives? What’s going on in my hips? Are my hip flexors really just too tight?
Well, probably not. What’s much more likely to be going on is something known as Femoral Acetabular Impingement or FAI for short. So what is FAI?
FAI is a motion related or position related pain in the hip or groin (1)
Generally gym related FAI is experienced either in the bottom of a squat or with sumo deadlifts. The pain is generally felt in the front of the hip or groin (in the hip flexor area) but can also be experienced in the back, buttock or thigh (1). In addition to pain, clicking, catching, locking, stiffness or giving way can be experienced as well (1).
What’s really important to understand with FAI is that it is not a condition of tight hip flexors limiting the squat. It’s actually the opposite.
I’ll put it this way, the hip flexors function to flex the hip. Basically they help bring your knee to your chest. This means that in the bottom of the squat the hip flexors are maximally shortened. They certainly are not being stretched in this position. Therefore, the hip flexors are not stretched to their limit and creating a mobility restriction in the bottom of the squat.

So what is that “blocked”, “pinching” sensation in the front of my hip? In order to understand this we’ll have to first talk about the anatomy of the hip

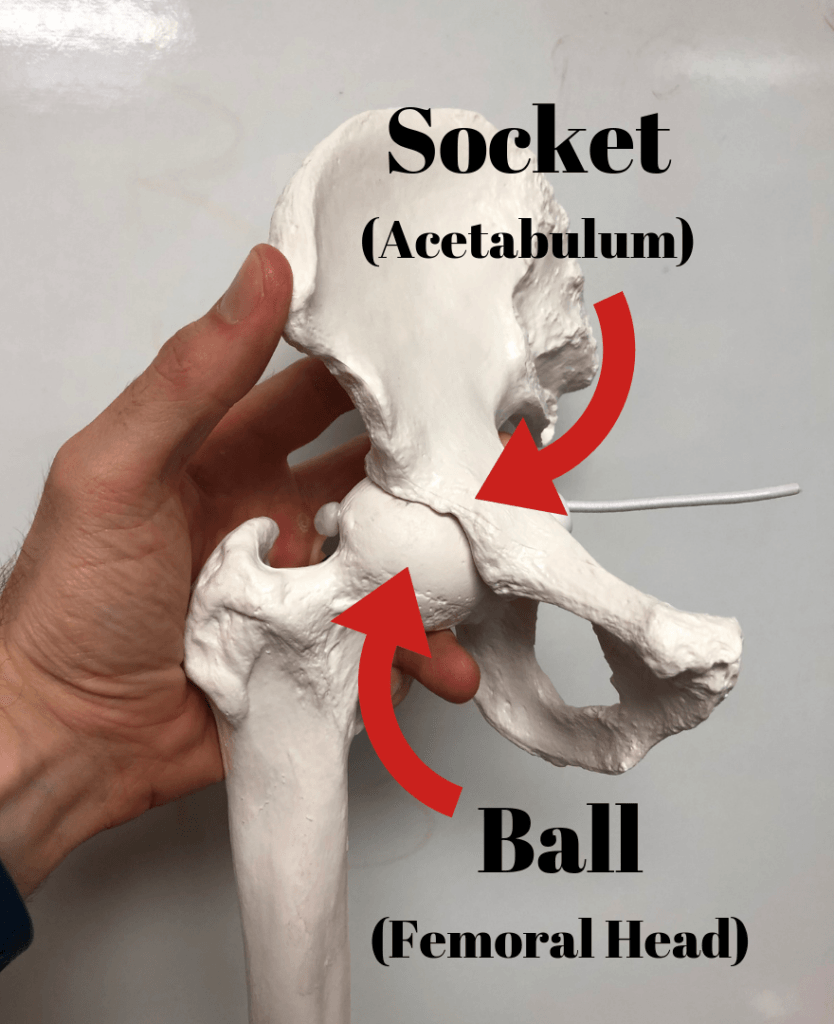
The hip is a ball and socket joint designed to be able to handle the forces of weight bearing (walking, running, jumping etc.) throughout the course of the day. Because of this it is inherently strong and stable.
The ball portion is the head of the femur and the socket portion is part of the pelvis known as the acetabulum. There is a great deal of boney coverage from the socket onto the ball. This is phenomenal because it allows the joint more strength and stability, both things we want.
However, the inherent stability provided by the ball and socket joint also represents a double edged sword. Because the hip socket has so much boney coverage it is prone to compression or “pinching” around the rim of the socket during end range of motion (Think of a rock bottom squat or a really wide stance sumo deadlift).
Now, we have a specific structure in our hips known as our labrum. The labrum is a ring of cartilage around the rim of our hip socket that serves to further increase the stability of the joint and also serves as a vacuum seal to keep fluid inside of the joint. This fluid serves to cushion the hip joint during weight bearing activities (walking, running, weightlifting etc.) and protects the cartilage that’s also within the hip (4).
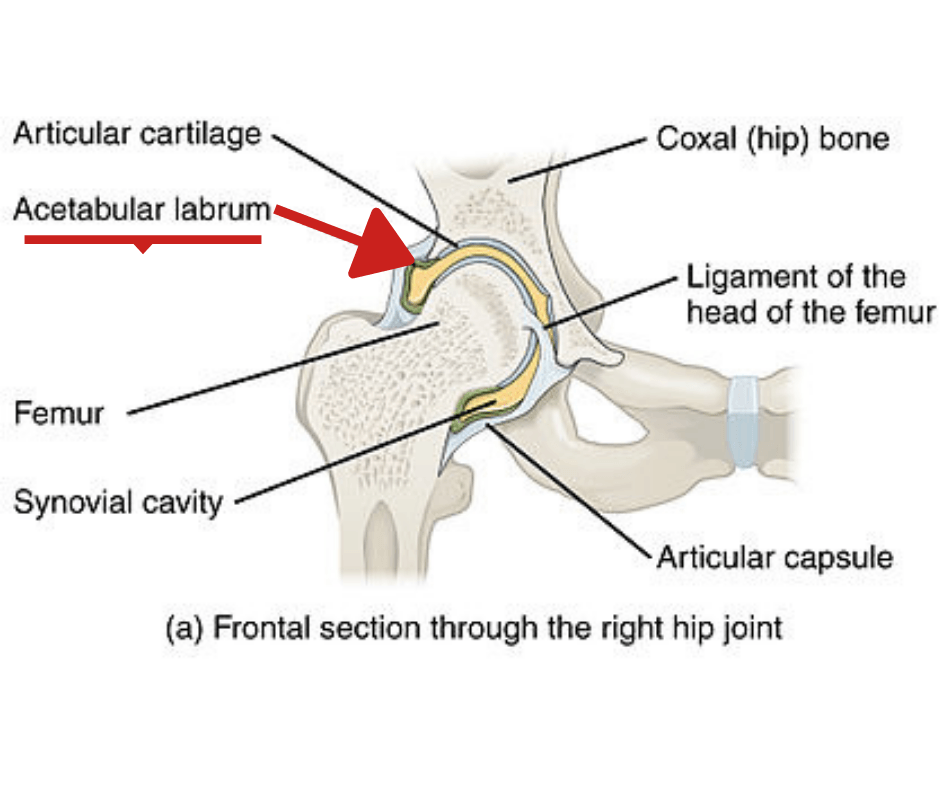
Image Source, License, Attribution: OpenStax College – Edited by Fitness Pain Free LLC
In the bottom position of a squat we are fully flexing the hip. In this position we are also increasing the amount of compression in the front portion (specifically the superior and medial or top and inside) of the hip and subsequently on the labrum. Unfortunately, when labral tears do occur, they generally occur in this area as well (4).
Check out the video below to see a hip going into flexion and the contact that occurs at the end range of motion.
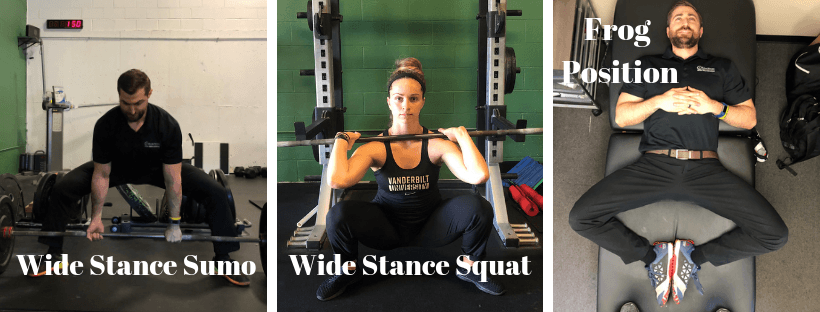
Now, the stress on the labrum changes with different positions of the hip. For instance, when we ABDuct and externally rotate the hip into what’s called “the frog position” the lateral border of the socket now comes into contact with the back side of the ball and compresses the labrum from the back side of the joint.
Check out the video below to see what’s happening in the “frog position”.
The reason why this is important is because if we use a wide stance with a large degree of toe out for either squatting or deadlifting, we’re potentially subjecting our labrums to the same compressive forces described above .
Now, these compressive or “pinching” forces are normal and our hips were designed to handle these forces in moderation. You can also make the argument that if we gradually and progressively apply these compressive forces to the hip (Think of a smartly designed squat or olympic weightlifting program) the hip joint actually adapts quite well to these forces.
In normal hips, the labrum is protected as long as very end range of motion is not exceeded. Like stated earlier, the hip was designed to handle the forces of life for the most part (although our body’s will inevitably wear and tear over the course of our lives and you can argue that competitive weight training is not something our bodies were designed to do).
Where we might be getting into trouble is when we’re forcing ourselves beyond our end ranges of motion and OVERLOADING the hip joint. If we simply throw too much compressive stress to the hip joint we may end up aggravating or injuring things (specifically the labrum).
So now it becomes apparent that the “tightness” or “pinching” experienced in the front of the hip during a squat or deadlift is actually not due to a tight muscle at all. It’s actually because we’re pinching structures (particularly the labrum) usually in the front part of the hip (4).
What this also means is that stretching the hip flexors isn’t going to fix the problem.
The problem is the amount of COMPRESSION that’s occurring in the front of the hip and that’s the issue we need to tackle. In order to fix this problem we still need to know a bit more about what actually creates this stress. So what factors affect the amount of compression our hips get during training?
- Variations in hip anatomy
- Your exercise technique and stance
- The exercise variations chosen (back squat vs. front squat)
- Programming (sets, reps, loading, exercise selection, etc.)
How Variations in Hip Anatomy Affect Hip Pain:
So before we go into some fixes for your hip pain, it’s important to understand that there are differences in everyone’s natural hip anatomy (1) and this will influence things like squat stance and programming.
The 2 largest variations in hip anatomy we’re concerned with are CAM and Pincer morphologies. Both of these variations are very common. CAM morphology is most common in males with a history of sports competition (~40-75% of male athletes have CAM morphology)(6). In the general population about 5-23% of people have CAM morphology (With variation depending on the population studied). Around 30% (varies based on the population and study) of young adults have pincer morphology. (6)
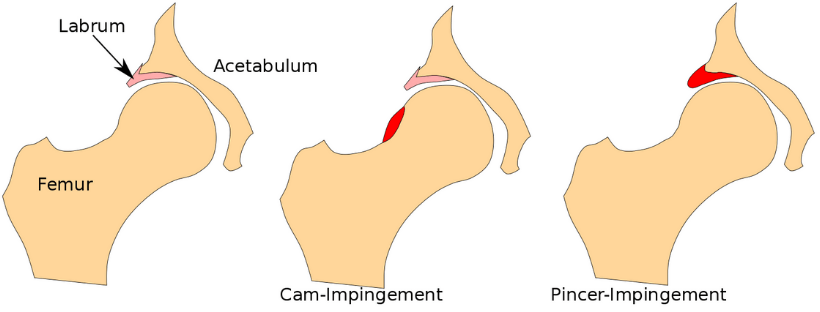
Image source, license, attribution: Takuma-sa – Edited by Fitness Pain Free LLC
A CAM morphology is basically extra bone on the ball (femoral head) portion of the hip joint while the pincer is extra bone on the socket portion of the hip joint. The reason why these are important is because if these structures are present they will increase compression in the front portion of the joint during deep squats.
Check out the video below to see where the CAM morphology lies on the femoral head and how it creates extra compression in the hip in the bottom of a squat.
Check out the video below to see where a pincer morphology lies on the acetabulum and how it creates extra compression in the hip in the bottom of a squat.
If you’re an athlete with a pincer and or a CAM morphology (yes they can co-exist) then you may be predisposed to increased compression of the labrum at the bottom of the squat or during sumo deadlifts. This probably influences what the healthiest squat stance and depth will be for you (more on this later).
On top of CAM and Pincer morphologies we also have variations in what’s called femoral torsion and acetabular version. Acetabular version is a fancy term that implies that some people have a hip socket that faces more forward or more backwards. Femoral torsion implies that some people have a ball (femoral head) that faces either more forward or more backwards.
Femoral Antetorsion or Acetabular Anteversion
NOTE: In the video I refer to version for both the socket (acetabulum) and ball (femoral). In reality, femoral changes are referred to as “torsion” while acetabular changes are referred to as “torsion”.
Femoral Retrotorsion or Acetabular Retroversion
The reason why this is important is because having either of these conditions will result in the ball being centered in the socket at varying degrees of toe out when standing. Forcing an athlete into a specific stance during squatting or deadlifting may be increasing compression of the labrum during the lift.
Now, if I have any sort of hip retroverson combined with a CAM morphology you’ll need to be extra cautious with your stance. Check out the video below to see why:
So if we have an athlete with a retroverted hip and we force them to squat with their toes straight ahead, not only are we limiting their ability to squat as deep but we’re also increasing compressive forces on the labrum. Like I said before, some stress in this region can be beneficial and potentially create positive adaptations but in excess can create issues as well.
The important thing to keep in mind is that it’s not a complete cause and effect relationship between hip morphology and pain. There are plenty of people out there with these morphologies and no pain whatsoever (actually the majority of people with these morphologies have no pain)(6).
It’s not like if you have one of these morphologies and you choose the wrong squat stance you’re going to blow your labrum to pieces. Chances are that if you acquired hip pain it was a combination of issues that eventually led to the problem.
Side Note: By definition having FAI requires having some sort of boney abnormality but I imagine some folks can have similar pain without it. Obviously we can be born with these issues but we’re also finding that those who play sports are also more likely to acquire CAM morphologies due to stress on the growth plate during adolescence and development. (24)
A lot of variables go into acquiring a painful hip with FAI. Some potentials reasons for acquiring FAI are listed below:
- Introducing a squatting or olympic weightlifting program too quickly (Not being prepared for a given program and jumping straight into it)(8,9,10,11)
- Being a novice trainee (<6 months to 1 year training experience) (12,13)
- Lack of consistency with training (12,15)
- Excessive training volumes (eg: too much squatting via sets, reps, frequency, etc.) (8,9,10)
- Excessive training loads (using more weight then your hip can handle)
- Spikes in training volumes (eg: A sudden spike in squat volume) (8,9,10)
- Lack of coaching and poor technique (11, 14)
- Utilizing a squat stance that places excessive stress on the hip (No research available currently – would love someone to study this)
- Poor recovery (nutrition, sleep, stress management, lack of recovery days between intense sessions) (17, 18)
- Mobility issues creating more stress at the hip (more on this later)
- Not taking prior hip injuries into account (16)
So now that we know why my hip started hurting…
How Do I Get Out of Pain and Back to Squats, Deadlifts and Olympic Lifts?
Now, before you start rehabilitating your own hip please make sure you’ve gotten yourself checked out by a physician, therapist, chiropractor or other licensed professional to make sure you’re a candidate for therapy and that there isn’t something more serious going on that needs a different treatment. This is not meant to be medical advise or to replace evaluation from a licensed professional.
I’ve created a 5 step plan to help you get out of pain and back to training squats, deadlifts and the olympic lifts. Here are the steps:
- Modify training and lifestyle activities to allow the irritated hip to calm down
- Identify and correct mobility limitations in the ankle, shoulders and thoracic spine to reduce stress on the hip
- Identify the proper squat stance for your unique hip anatomy
- Correct technique issues in the squat, deadlift and olympic lifts
- Start gradually loading the hip through a progressive strengthening program
Modify training and lifestyle activities to allow the irritated hip to calm down
After a hip injury, what’s important to understand is that pain is a natural and normal protective response our brains produce (20) to make sure we don’t do anything stupid and hurt ourselves further in the gym. So initially after an injury it’s very important to temporarily avoid aggravating activities to give the hip time to heal and pain levels to calm down.
What’s typically good about hip pain is that it is fairly predictable in terms of what movements create pain and which don’t. Like we stated earlier, too much end range of motion at the hip is usually what gets us into trouble in the first place and those same end ranges of motion need to be temporarily avoided to calm things down. This means 2 things:
- Your regular lifestyle activities should be temporarily modified to avoid aggravating your hip
- Your regular gym training should be temporarily modified to avoid aggravating your hip
Some lifestyle activities that may potentially cause pain and need to be modified
- Sitting
- Running
- Stairs
- Squatting
In general, sitting is one of the most painful activities for people with hip pain. This becomes a major challenge because we often are required to sit for work and for traveling in a car or airplane. My recommendation is to avoid siting as much as possible to allow the hip to calm down. If you’re unable to avoid sitting try:
- Sitting in the highest chair possible with space between the knees
- Stand frequently and go for a quick walk to loosen the hips
- Sit with a slouched low back posture to reduce compression in the front of the hip
- Raise your car seat and take the car seat back as far as you can while still driving safely
- Recline the car seat back – Many cars have an adjustable steering wheel you can bring closer to your body to allow you to still drive safely
- Use a pedometer and try to increase the amount of steps you take throughout the course of the day
The second part of the solution will require making some major modifications to any exercises that are aggravating in the gym. Common culprits that will need to be modified initially:
- Squatting (Full depth usually the worst)
- Full depth olympic lifts (cleans, snatches)
- Deadlifts – normally sumo but sometimes conventional as well
My general rule for modifying is that any movement that creates more than a 2/10 pain (on a 0-10 pain scale) during, after or the day following training needs to be modified. Obviously this is going to be different from person to person and it will take some experimentation to get right.
We’re going to want to temporarily unload the joint by avoiding aggravating movements for somewhere between 4-6 weeks following an injury to the hip
I know this is tough to hear for someone who absolutely loves to lift, but it’s important for long term success during rehabilitating and if we skip this step we could be setting ourselves up for a long term failure and frequent future exacerbations.
It also depends a lot on the individual. I’ve had FAI in both of my hips and I’ve had to unload squatting for over 6 months to get it to calm down enough to progress back again. Some take longer, some shorter.
So here’s the thing. You don’t have to stop training, nor should you. We just need to unload the hip enough so we can start making progress in the right direction. What it does mean is that you’ll have to learn how to modify your training to respect these pain guidelines. Movement must be modified if:
- The exercise creates >3 out of 10 pain during training
- The exercise creates pain above your normal baseline after the session
- The exercise creates pain the following day
Keep in mind that many people don’t experience pain during training, but they feel a lot of it the following day. For some people they can “warm-up” the hip to the point where it doesn’t hurt. If you have to warm-up the hip thoroughly just so you can do it without pain, then it probably should be modified.
To help you navigate through the modification process I’ve created principles for both the squat and deadlift to help you modify movements to stay within the pain parameters discussed above. I’ve also created handy dandy modification infographics to help you navigate the modification waters as well:
Squatting and Hip Pain Principles
Here are 7 principles that increase stress in the hip during the squat:
- A Narrow Stance With No Toe Out – Increased hip flexion (deeper squats), internal rotation (more knee in) and adduction (narrow stance) are all movements that can increase impingement of the hip.
- An Excessively Wide Squat Stance with a Lot of Toe Out – Just as having a narrow stance can cause problems, the same can be said about the other extreme.
- Increased Depth of Squatting – Deeper squats are generally more stressful than more shallow variations.
- Increased Torso Inclination – The more the torso is pitched forward and the hips are sent back the more hip flexion occurs and stress on the hip is increased
- Ankle Mobility Restrictions – Having less mobility in the ankle will force more movement to the hip and increase impingement.
- Anterior Pelvic Tilt – Anterior pelvic tilt combined with excessive lower back extension increases impingement at the hip
- Dynamic Valgus or “Knee In” – If the knee travels inward during a squat (in relationship to the 2nd toe) the hip joint is going into internal rotation and adduction which are the two movements that increase impingement of the hip.
6 Pro Tips For Reducing Pinching Hip Pain in the Bottom of the Squat
- Attempt to modify squat stance to eliminate symptoms
- Increase or decrease toe out
- Narrow or widen stance
- Limit depth of squat variation
- Exercise examples: Box Squat with limited depth or 1/2 squats
- Pick more upright squat variations – A more upright torso requires less hip motion and can alleviate impingement
- Front squats as opposed to back squats
- High bar back squats over low bar
- Add ankle mobility – More ankle mobility will decrease the need for additional hip mobility in a deep squat
- Mobilize the ankles
- Add a heel lift or wear olympic weightlifting shoes
- Modify pelvic position
- Extending the lumbar spine excessively and anteriorly tilting the pelvis will bring the socket portion closer into contact with the femur
- Ensure athletes aren’t overextending in the bottom of the squat
- Don’t allow “knee in”
- Ensure the knee is aligned over the toe especially at the bottom of the squat
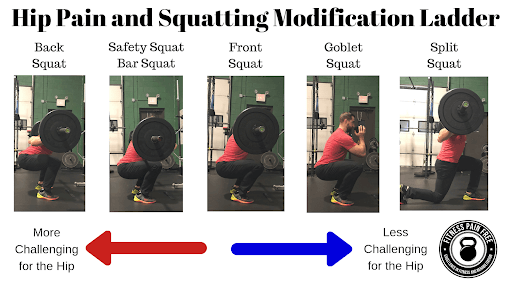
Squat Modification Ladder for Hip Pain – When you are unable to eliminate pain by slowing down reps, attempting a higher rep range or modifying technique, use the ladder below to find a pain free squatting variation.
Now that you’re a master at modifying the squat…
Deadlifting and Hip Pain Principles
Generally speaking, 5 things that increase stress to the hip in the deadlift are:
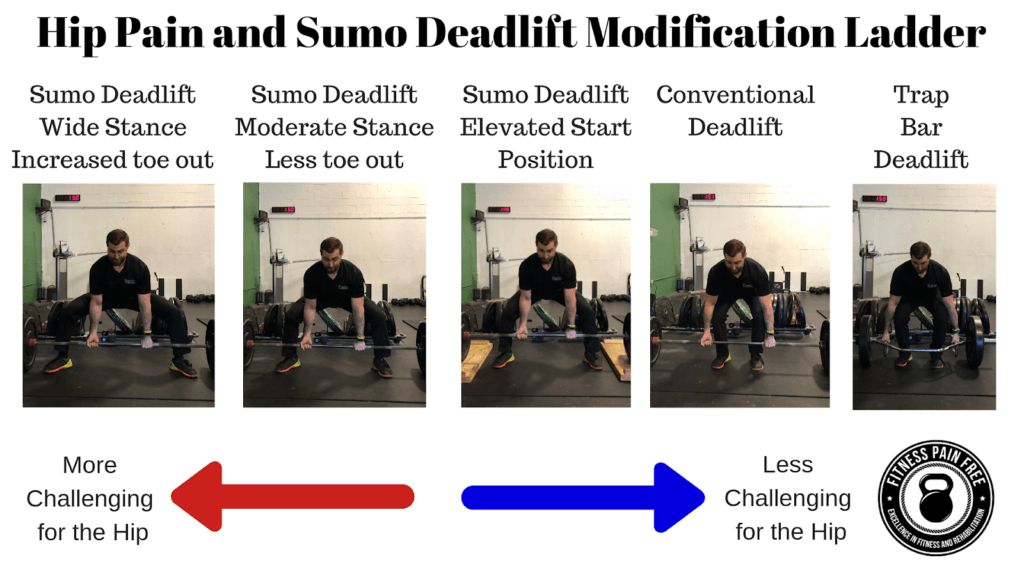
- A Wider Squat Stance and More Toe Out – A wide stance with a lot of toe out reduces the distance the bar has to travel and increases the use of the legs to drive the bar up, but also exposes the hip joint to a more challenging range of motion.
- Increased Depth of Deadlift – Most deadlifts are generally pulled from the floor but keep in mind that deficit deadlifts will expose the hip to an even great range of motion thereby increasing stress while partial ranges do the opposite.
- Getting Closer to the Bar During the Set-up – Getting closer to the bar at the set-up of a sumo deadlift by driving the knees out wide will place the hip into more abduction and external rotation. This can be irritating to painful hips
- Anterior Pelvic Tilt – Increasing anterior pelvic tilt will increase compression at the front of the hip during the set-up of sumo deadlifts. Anterior pelvic tilt is combined with lumbar extension (arching) and can be detected by looking for excessive lower back arching in the set-up of the deadlift.
- Aggressive Lockout – Locking out a deadlift by aggressively flexing the glutes and forcing the hips forward places the hip into end range extension combined with external rotation and abduction. This can be irritating for painful hips.
5 Pro Tips For Reducing Hip Pain During Deadlifts
- Attempt to modify sumo stance to eliminate symptoms
- Decrease stance width or amount of toe out in the sumo deadlift
- Increase stance width or amount of toe out in the conventional deadlift
- Limit depth of deadlift
- Pull your deadlifts from an elevated surface to decrease stress on the hip
- Move the hips back from the bar at set-up during sumo deadlifts – Pushing the hips back slightly from the bar at set-up will reduce the amount of abduction and external rotation at the hip and can reduce pain
- Modify pelvic position – Ensure your lower back is in a neutral position at the set-up of the deadlift
- Don’t lock out aggressively – Make sure you finish each rep with full hip extension but don’t aggressively slam into extension with every rep.
Sumo Deadlift Modification Ladder for Hip Pain – When you are unable to eliminate pain by modifying technique, use the ladder below to find a pain free deadlift variation.
and last but certainly not least…
Olympic Weightlifting and Hip Pain Principles
Generally speaking, 7 things that increase stress to the hip during olympic lifts are:
- A Narrow Stance With No Toe Out – Increased hip flexion (deeper squats), internal rotation (more knee in) and adduction (narrow stance) are all movements that can increase impingement of the hip. Catching cleans and snatches with a narrow toe ahead stance (especially with knee in) can irritate painful hips.
- An Excessively Wide Squat Stance with a Lot of Toe Out – Just as having a narrow stance can cause problems, the same can be said about the other extreme.
- Increased Depth of Squatting – Deeper squats are generally more stressful than more shallow variations.
- Increased Torso Inclination – The more the torso is pitched forward and the hips are sent back the more hip flexion occurs and stress on the hip is increased
- Ankle Mobility Restrictions – Having less mobility in the ankle will force more movement to the hip and increase impingement.
- Anterior Pelvic Tilt – Anterior pelvic tilt combined with excessive lower back extension increases impingement at the hip
- Dynamic Valgus or “Knee In” – If the knee travels inward during a squat (in relationship to the 2nd toe) the hip joint is going into internal rotation and adduction which are the two movements that increase impingement of the hip.
6 Pro Tips For Reducing Pinching Hip Pain During Olympic Weightlifting
- Attempt to modify squat stance (where the clean or snatch is caught in a deep squat) to eliminate symptoms
- Increase or decrease toe out
- Narrow or widen stance
- Limit depth of squat variation
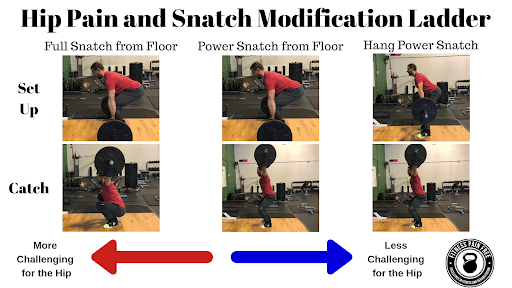
- Exercise examples: Power variations of the olympic lifts
- Stay more upright when catching cleans and snatch – A more upright torso when rising up out of a snatch or clean requires less hip motion and can alleviate impingement.
- Add ankle mobility – More ankle mobility will decrease the need for additional hip mobility in a deep squat
- Mobilize the ankles
- Add a heel lift or wear olympic weightlifting shoes
- Modify pelvic position
- Extending the lumbar spine excessively and anteriorly tilting the pelvis will bring the socket portion closer into contact with the femur
- Ensure athletes aren’t overextending in the bottom of the squat
- Don’t allow “knee in”
- Ensure the knee is aligned over the toe especially at the bottom of the squat
When you are unable to eliminate pain by modifying technique, use the ladder below to find a pain free olympic lifting variation.

So now you should be armed with the knowledge required to modify your training to unload the hip. Just keep in mind that after an injury often times the area won’t tolerate the loads and volume that it normally does. For this reason you may also have to reduce the weight, sets, reps and or frequency (how many times you perform the lift per week) on some of your hip intensive lifts. Onto the next step…
Identify and correct mobility limitations in the ankle, shoulders and thoracic spine to reduce stress on the hip
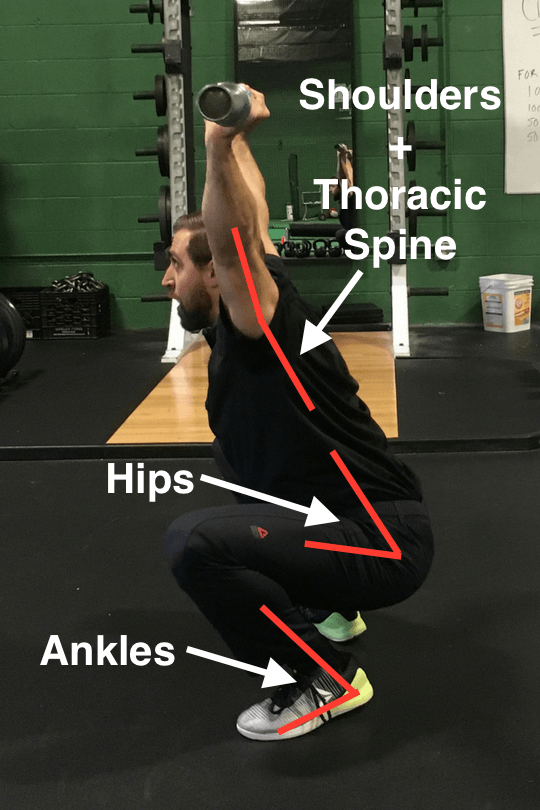
Squatting requires adequate mobility from the ankles, hips and thoracic spine to perform. If snatching is your thing then shoulder mobility becomes a player. Even during the clean we need adequate mobility in the wrist, elbow and shoulder. You can see that performing these movements requires quite a bit of mobility.
An important concept to understand is that if you’re lacking mobility at one joint then you’ll be forced to make up that mobility at another joint. Check out the images below to see how limited ankle mobility can force more motion at the hip.
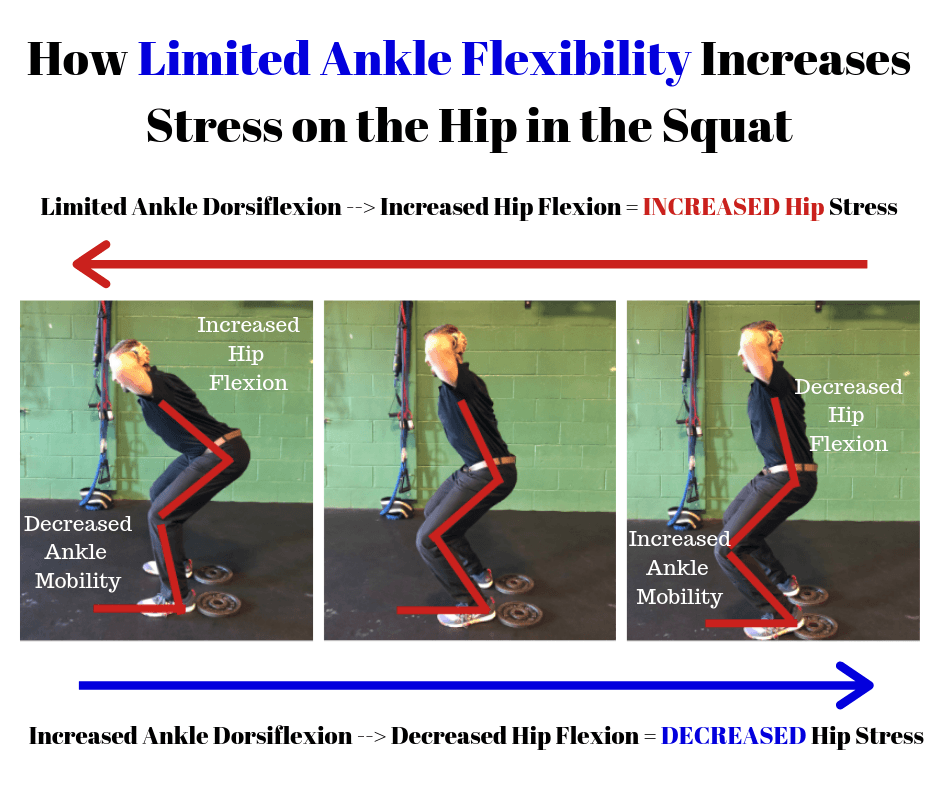
As you can see in the image, the greater the degree of ankle dorsiflexion in the squat, the less the motion requirement at the hip. The heel lift just adds additional mobility, just like an olympic lifting shoe does.
The same thing can happen when the thoracic spine is tight. If the thoracic spine is tight and limited, you’ll be forced to overextend from the lower back (lumbar spine) to stay upright in the squat. This lumbar overextension creates anterior pelvic tilt at the hip and increases compressive forces there.

So if FAI is created by excessive motion at the hip, it makes sense that we need to ensure that the joints above and below have adequate mobility so we aren’t forcing the hip to pick up the slack in terms of motion.
Here are the areas we need to assess to ensure the hip isn’t working overtime:
- The thoracic spine
- The ankle
- The front rack (for the clean)
- The shoulder (for the snatch and overhead squat)
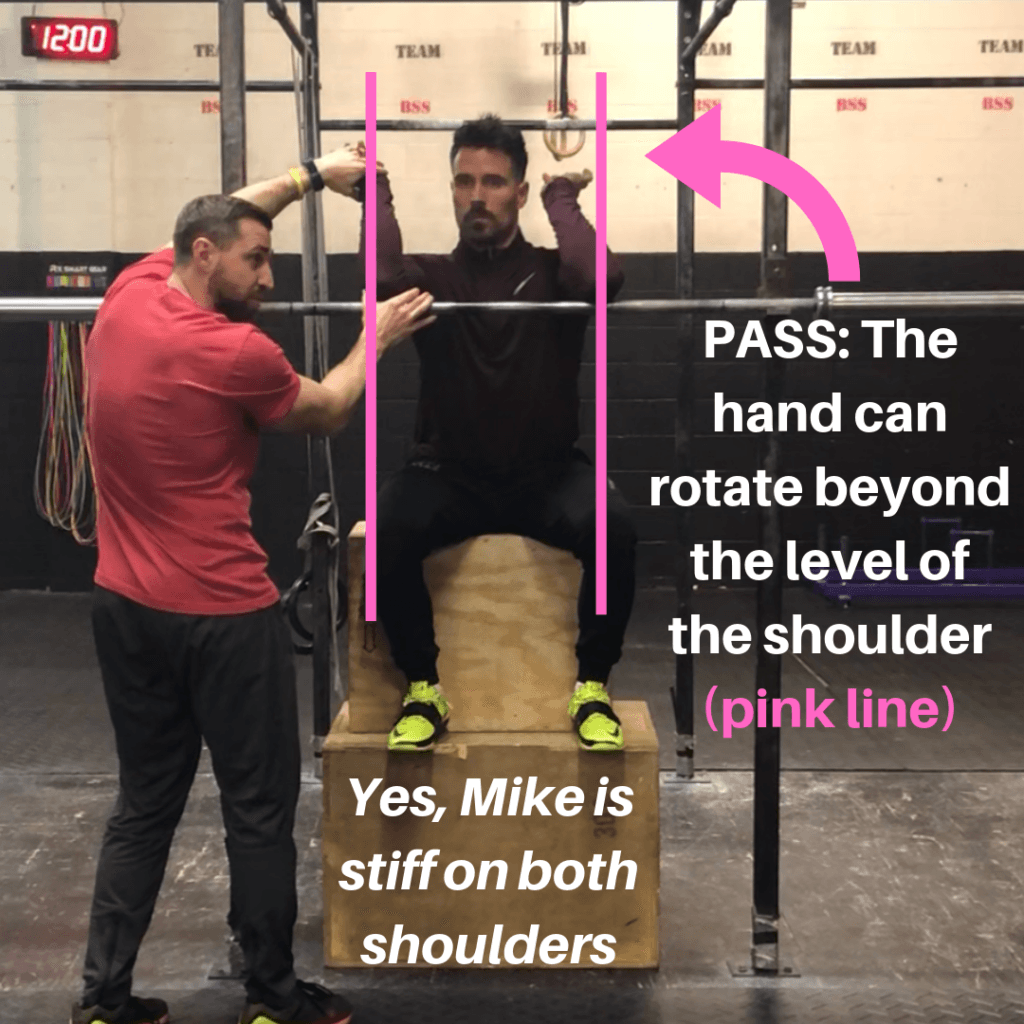
1: Assessing the Thoracic Spine and Overhead Mobility
Check out the video below to see my favorite assessment for the thoracic spine and overhead mobility:
If you find that you’ve got a restriction in the thoracic spine then gaining some mobility here can help reduce some of the stress in your hips during squats. Here are a few of my favorite thoracic spine mobility exercises below:
If you find you’ve got an overhead mobility limitation here are some of my resources to help you correct this:
2: Assessing the Ankle Joint
Ankle mobility is important for reducing stress in the hip joint but also for achieving enough depth in the squat and maintaining an upright torso in the bottom of the squat. Check out the video below to learn how to assess your ankle mobility:
If you find a restriction, it’s a good idea to work on correcting this. Check out the video below to see some of my favorite ankle mobility exercises:
3: Assessing the Front Rack
If there is a restriction in front rack mobility it will lead to compensation and increased motion at the hip. Fortunately for you I’ve created an in depth article to help you figure out if you have any mobility restrictions in your front rack and how to improve it:
The Ultimate Front Rack Mobility Guide
These mobility drills can be started immediately after starting rehabilitation and should be continued throughout. Once we have adequate motion in all joints involved we’ll also have to ensure that we have adequate technique. More on this later…
4: What about hip mobility?
Great question. Remember that hip pain is generally a result of EXCESSIVE motion at the hip joint. Continuing to stretch the hip joint is certainly not going to correct the problem and in the worst case can actually worsen your hip pain.
Here’s the other thing, having stiffer hip muscles may actually protect against hip pain.
Think about it. Let’s say I have really stiff muscles that don’t allow me to get into the very bottom of a squat. Those stiff muscles are actually preventing me from getting boney contact between the ball and socket. In other words they’re actually preventing impingement.
I do have a few exceptions to this rule though. In sports like olympic weightlifting where squat depth is absolutely critical, I still like to perform some hip mobility to ensure our athletes can hit depth and perform the lifts with good technique. Just keep in mind that all of these mobility drills need to be pain free when performing them and may otherwise be further irritating the area when performed.
Identify the proper squat stance for your unique hip anatomy
One of the reasons I’m so adamant about choosing the right squat stance for your hips is because we have a fairly robust collection of medical evidence showing a strong correlation between CAM morphologies and eventual hip arthritis and total hip replacement. (6)
Side Note: Keep in mind that your risk of getting hip arthritis even if you have a CAM morphology is still relatively low. However, your risk of getting arthritis is greater if you have a CAM morphology then without it.
So the next question becomes, how do we determine the most optimal stance for my squats?
Assessing the hip can get very complicated very quickly. Secondly, many of our common tests to check for morphologies are actually quite poor and don’t give us the information we need (19). Lastly, they don’t necessarily give us any information about what our best squat stance should be.
For these reasons my assessment for the hip is quite simple and very specific to the squat. Check it out below:
Once you’ve identified your best squat stance we’ll want to start utilizing this stance once we return back to squatting. After you’ve gone through a period of unloading the squat and other painful movements it’s time to start slowly introducing them in again. However, we need to make sure that technique is dialed in before we jump right back in…
Correct technique issues in the squat, deadlift and olympic lifts
Now we already spoke about a few important technical pieces from a mobility perspective to reduce hip pain. The general theme is that we want adequate mobility from the ankles and thoracic spine so we don’t have to bend or flex so much at the hip. Before we talk technique we’ll go over three more important concepts:
- Motion at the lower back (lumbar spine) and pelvis contributes to impingement at the hip.
- Hip internal rotation and adduction contributes to impingement at the hip
- Torso angle influences impingement at the hip
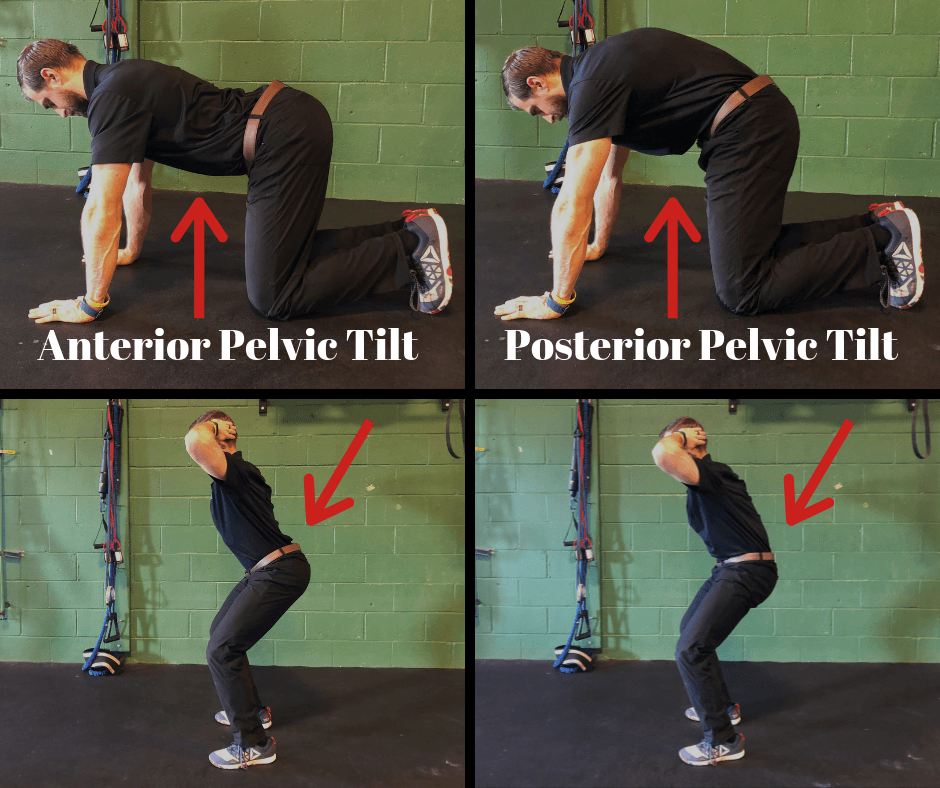
Just as flexing or bending the hip more increases impingement at the front of the hip, extending the lower back and anteriorly tilting the pelvis also increases compression at the front of the hip
If we squat in anterior pelvic tilt we’re creating more impingement at the front of the hip. If we keep in a neutral position throughout we decrease some of this. What this means is that we’ll have to learn how to get into a neutral spinal position during squats, deadlifts and olympic lifts and be on the lookout for anterior pelvic tilt. Here’s how to ensure braced neutral in the squat and deadlift (same strategy for olympic lifts)
Here’s another quick video on how to correct overextension of the low back in the squat if you find it:
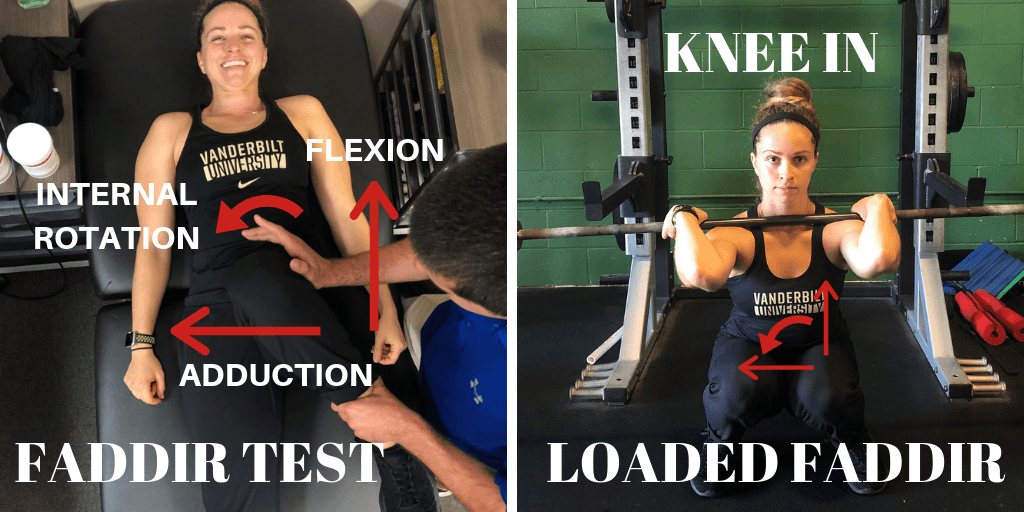
The next technical detail has to do with knee in at the bottom of a squat. This is a common compensation for some athletes as the weights get heavier and form starts to slip. This is a bit of a problem because knee in at the bottom of a squat is combining the hip motions of flexion, internal rotation and adduction.
These 3 motions directly increase compression at the front of the hip joint and there is actually a special tested called the FADDIR (Flexion, ADDuction, Internal Rotation) test in orthopedic medicine that is designed to diagnose labral tears and impingement in the hip. If our knees are caving in at the bottom of a squat we’re increasing impingement at the hip.
Check out the video below to see how to spot and correct this:
For more information about why the knees come in at the bottom of a squat and whether it’s important or not check out my resources below:
- Knee Cave in During Squats – When Does it Matter and How Can We Improve It?
- Why Do The Knees Come in During Heavy Squats?
- Another Reason Knees Come in During Heavy Squats
Lastly, the more torso inclination you choose to utilize during a squat, the more hip flexion and subsequent impingement you’ll create. Excessive torso inclination can come from a lack of ankle mobility, it can also come from cueing athletes to sit back during the squat and lastly, it can be a strategy used by athletes simply because they’re strong in that position.
It will be important to figure out why you may have so much torso inclination because that will decide what the fix will be for it. Either way, getting more upright during squats should decrease some impingement at the front of the hip.
Start gradually loading the hip through a progressive strengthening program
Exercise helps us rehabilitate from an injury through a process called mechanotransduction (21). Basically exercise causes a cascade of reactions that leads to our tissues healing and adapting to the stress that we’re throwing at it (21). In other words, you need to show your body (our hip in this case) the same stresses it needs to be able to handle so that it can adapt and heal.
With this in mind, exercise dosage becomes incredibly important. When you have a headache taking 2 aspirin can get the job done and have you feeling better. If you decide to take the entire bottle then you’ll most likely end up dead. The aspirin wasn’t the problem, it was the DOSAGE of the medicine. Think of exercise as the medicine that will heal your hip. We just need to be very careful with our dosage of exercise medicine.
What needs to be kept in mind is that exercise dosage actually needs to start pretty low and then will need to ramp up over the course of time as the hip improves.
Remember that pain is your body’s way of trying to keep you safe. Your body is smart. It remembers the past stresses you’ve thrown at your hip that created issues in the first place. It isn’t going to allow you to bounce straight back into training for fear of repeating past mistakes. You’ve violated your body’s trust and it’s going to take some time and diligence to win back trust and get pain to go down and get you back to hitting squat and deadlift PRs.
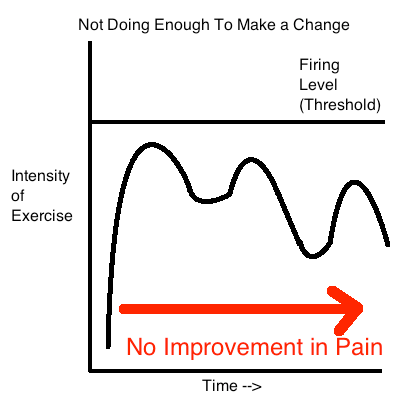
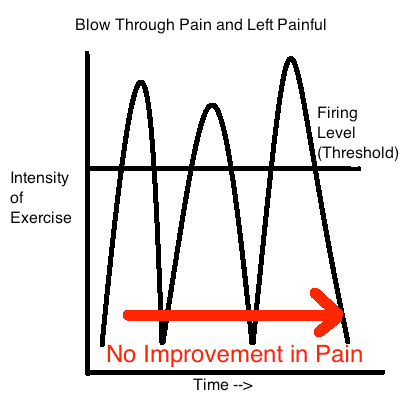
So how do we dose exercise appropriately. Not enough stress may not get the effect we want, too much stress and we go backwards. It’s kind of a goldilocks situation. Too much stress and we violate the body’s alarm system and get more pain. Not enough stress and we may not make a change. Remember that exercise will help heal our tissues and if we don’t apply the medicine we may not get the improvement we want.
I like to use pain as a guideline for loading the hip. Basically if we’re keeping pain below a certain threshold then we’re probably doing things appropriately. Having small amounts of pain is not only normal but can be a sign that we’re applying the right amount of stress to the joint.
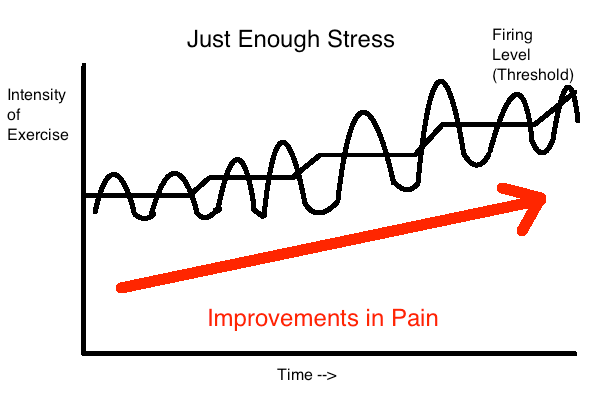
As you progress over the course of time we just dial up the stress to match where the hip is in terms of rehabilitation. What this also means is that as our hips improve we can slowly start leaking exercises back into our training program that were previously too painful. As discussed previously here are my guidelines to help determine dosage of exercise based on pain levels:
- Pain should be minimal or at or below a 3/10 on a 0-10 pain scale during exercise
- Pain levels should return to baseline following exercise and the following day
- Pain and function should be improving on a weekly and monthly basis
- Exercises should be introduced with low volume and intensity initially (low loads, sets, reps, days / week)
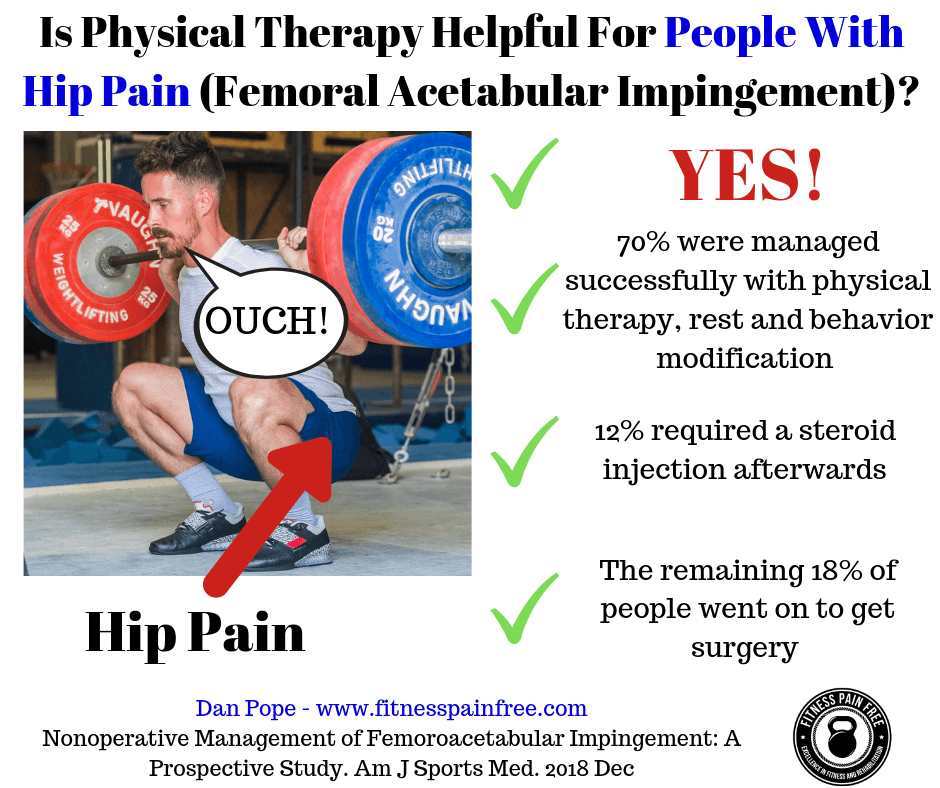
As far as we know right now (research on physical therapy treatment for FAI is limited) the best treatments for hip pain are going to be rest, education, activity modification and exercise (22,23).
If you’ve been reading this article series and taking in the information then you’ve already gotten the education component down. If you’ve been modifying your lifestyle and exercises in the gym you’ve also got the rest and activity modification part down. Next we just need to get the strengthening part down. Remember that strengthening should be progressive in nature and it also needs to focus on the musculature around the hip and core. Here are some of my favorite core and hip strengthening exercises I like to use commonly:
For the Adductor Muscles:
For the Glute Medius and Lateral Core Muscles:
For the Anterior Core and Hip Flexors:
For the Glute Max and Posterior Hip Muscles
Also keep in mind that all lunge, step-up and single leg squat and deadlift variations fit into this category.
The limited evidence we have on hip rehabilitation programs shows a duration of rehab from 6-12 weeks (22,23). Just keep in mind that depending on the severity of the injury, how long you’ve been in pain and how intense of a program you want to get back into, this could be shorter or longer. Remember that for me it took a good 6-12 months to get back to the type of training I wanted to get back to (olympic weightlifting, powerlifting).
Side Note: More recent research is now suggesting that atleast 3 months of strengthening is optimal for improving FAIs symptoms (25)
Also keep in mind that your exercise program needs to slowly progress back to squatting, deadlifting and olympic lifts (if those are the lifts you want to get back to). That means slowly introducing these movements as the hip tolerates them. Keep in mind the modification ladders discussed earlier in the article. One easy strategy for returning to these lifts is to start with the easiest variations on the ladder and progress up the ladder every 2-4 weeks as the hip tolerates each movement.
So now that we went over these principles to help get you out of pain, how does the program end up looking? Let’s put it all together.
Return to Weight Training After Hip Pain Program
Week 0-4: Train 3 days / week
- Eliminate aggravating exercises (full depth squats, sumo deadlifts, full depth olympic lifts)
- Modify squats, deadlifts and olympic lifts to continue training while allowing the hip to calm down
- Hang power olympic lifts
- Conventional deadlift off elevated surface
- Partial range front squat to box
- Begin core and hip strengthening program 3x per week
- Begin mobility program to address limitations
- Progress to the next phase when mostly pain free with daily activities (~4 weeks)
Week 4-8: Train 3 days / week
- Advance squat, deadlifts and olympic lift challenge for the hip
- Power olympic lifts from floor
- Sumo deadlift off elevated surface (moderate stance)
- Goblet squat full range (pause in bottom)
- Advance core and hip strengthening program
- Continue Mobility Program
Week 8-12: Train 3 days / week
- Advance squat, deadlifts and olympic lift challenge for the hip
- Full depth olympic lifts (slow descent into bottom of squat with pause in bottom)
- Sumo deadlift from floor (3 second lower to the floor)
- Front squat full range
- Advance core and hip strengthening program
- Continue Mobility Program
Week 12+: Train 3 days / week
- Continue building back to your normal training program
So that’s it! What a long article huh? Who would have thought there was so much to write about with this joint huh? Anyway, I hope this article was helpful in showing you how to get out of pain and back to training your favorite lifts.
If you’re looking for a completely done for you training program to help with your hip pain then you’re actually in luck. The program is called “Ultimate Hip”
I’ve taken the guesswork out of finding the right amount of sets and reps and which exercises to use and which to avoid. It’s all 100% outlined. Consider it your roadmap to get out of pain and back to training.
Click HERE to Learn More and Get Instant Access
Hip pain obliterated,
Dan Pope DPT, OCS, CSCS, CF L1
References:
- The Warwick Agreement on femoroacetabular impingement syndrome (FAI syndrome): an international consensus statement https://bjsm.bmj.com/content/50/19/1169 BJSM 2016
- Capsular Management in Hip Arthroscopy: An Anatomic, Biomechanical, and Technical Review Front Surg. 2016 https://www.ncbi.nlm.nih.gov/pmc/articles/PMC4778552/
- Labral Tears – Mayo Clinic https://www.mayoclinic.org/diseases-conditions/hip-labral-tear/symptoms-causes/syc-20354873
- The labrum: structure, function, and injury with femoro-acetabular impingement J Child Orthop. 2012 Oct https://www.ncbi.nlm.nih.gov/pmc/articles/PMC3468736/
- Does Femoroacetabular Impingement Cause Hip Instability? A Systematic Review Colin D. Canham, M.D., Yi-Meng Yen, M.D., Ph.D., and Brian D. Giordano, M.D. https://www.ncbi.nlm.nih.gov/pubmed/26427629
- The Prevalence of Cam and Pincer Morphology and Its Association With Development of Hip Osteoarthritis. Van Klij, P., Heerey, J., Waarsing, J. H., & Agricola, R. (2018). Journal of Orthopaedic & Sports Physical Therapy, 48(4), 230–238.doi:10.2519/jospt.2018.7816
- A 4-Year Analysis of the Incidence of Injuries Among CrossFit-Trained Participants Orthop J Sports Med. 2018 Oct; 6 https://www.ncbi.nlm.nih.gov/pmc/articles/PMC6201188/
- The Development and Application of an Injury Prediction Model for Noncontact, Soft-Tissue Injuries in Elite Collision Sport Athletes. (n.d.). Retrieved August 01, 2016, from https://www.researchgate.net/publication/46288877_The_Development_and_Application_of_an_Injury_Prediction_Model_for_Noncontact_Soft-Tissue_Injuries_in_Elite_Collision_Sport_Athletes
- Relationship Between Training Load and Injury in Professional Rugby League https://www.researchgate.net/profile/Tim_Gabbett/publication/49775412_Relationship_between_training_load_and_injury_in_professional_rugby_league_players/links/551894590cf2d70ee27b41ad.pdf
- Training and game loads and injury risk in elite Australian footballers. (n.d.). Retrieved from https://www.researchgate.net/profile/Brent_Rogalski/publication/234699103_Training_and_game_loads_and_injury_risk_in_elite_Australian_footballers/links/53dadd6b0cf2a19eee8b3f9f.pdf
- The risk of injuries among CrossFit athletes: an Italian observational retrospective survey. Tafuri S1, Salatino G2, Napoletano P3, Monno A4, Notarnicola A
- A 4-Year Analysis of the Incidence of Injuries Among CrossFit-Trained Participants Orthop J Sports Med. 2018 Oct; 6 https://www.ncbi.nlm.nih.gov/pmc/articles/PMC6201188/
- Injury Incidence and Patterns Among Dutch CrossFit Athletes Orthop J Sports Med. 2017 Dec; 5(12): 2325967117745263. Published online 2017 Dec 18. doi: 10.1177/2325967117745263 Mirwais Mehrab, BSc,*† Robert-Jan de Vos, MD, PhD,‡ Gerald A. Kraan, MD, PhD,† and Nina M.C. Mathijssen, PhD†
- Injury Rate and Patterns Among CrossFit Athletes Orthop J Sports Med. 2014 Apr; 2(4): 2325967114531177. Benjamin M. Weisenthal, BA,* Christopher A. Beck, MA, PhD,† Michael D. Maloney, MD,‡ Kenneth E. DeHaven, MD,‡ and Brian D. Giordano, MD‡§
- Musculoskeletal injuries in Portuguese CrossFit practitioners. J Sports Med Phys Fitness. 2019 Feb 5. doi: 10.23736/S0022-4707.19.09367-8. [Epub ahead of print] Minghelli B1, Vicente P2.
- INJURY RISK IS ALTERED BY PREVIOUS INJURY: A SYSTEMATIC REVIEW OF THE LITERATURE AND PRESENTATION OF CAUSATIVE NEUROMUSCULAR FACTORS Int J Sports Phys Ther. 2014 Oct; 9(5): 583–595. Jessica Fulton, PT, DPT, HFS,1 Kathryn Wright, PT, DPT,1 Margaret Kelly, PT, DPT, CSCS,1 Britanee Zebrosky, PT, DPT, CSCS,1 Matthew Zanis, PT, DPT, ATC, CSCS,1 Corey Drvol, PT, DPT,1 and Robert Butler, PT, PhD1
- Chronic lack of sleep is associated with increased sports injuries in adolescent athletes. J Pediatr Orthop. 2014 Mar;34(2):129-33. doi: 10.1097/BPO.0000000000000151. Milewski MD1, Skaggs DL, Bishop GA, Pace JL, Ibrahim DA, Wren TA, Barzdukas A.
- Psychological predictors of injury among elite athletes S A Galambos1, P C Terry1, G M Moyle1, S A Locke1 BJSM 2005
- Is Boney Hip Morphology Associated With Range of Motion and Strength in Asymptomatic Male Soccer Players? JOSPT 2018
- Therapeutic Neuroscience Education Louw 2013
- Mechanotransduction: Relevance to Physical Therapist Practice-Understanding Our Ability to Affect Genetic Expression Through Mechanical Forces. Phys Ther. 2016 May;96(5):712-21. doi: 10.2522/ptj.20150073. Epub 2015 Dec 23. Dunn SL1, Olmedo ML2.
- The Physiotherapy for Femoroacetabular Impingement Rehabilitation STudy (physioFIRST): A Pilot Randomized Controlled Trial. Kemp, J. L., Coburn, S. L., Jones, D. M., & Crossley, K. M. (2018). Journal of Orthopaedic & Sports Physical Therapy, 48(4), 307–315.doi:10.2519/jospt.2018.7941 https://www.ncbi.nlm.nih.gov/pubmed/29607766
- Nonoperative Management of Femoroacetabular Impingement: A Prospective Study. The American Journal of Sports Medicine, Pennock, A. T., Bomar, J. D., Johnson, K. P., Randich, K., & Upasani, V. V. (2018). 036354651880480.doi:10.1177/0363546518804805
- Van Klij P, Heijboer MP, Ginai AZ, Verhaar JAN, Waarsing JH, Agricola R. Cam morphology in young male football players mostly develops before proximal femoral growth plate closure: a prospective study with 5-yearfollow-up. Br J Sports Med. 2019 May;53(9):532-538. doi: 10.1136/bjsports-2018-099328. Epub 2018 Oct 15. PMID: 30323059.
- Kemp JL, Mosler AB, Hart H, et al Improving function in people with hip-related pain: a systematic review and meta-analysis of physiotherapist-led interventions for hip-related pain British Journal of Sports Medicine 2020;54:1382-1394.