Updated 8/5/2021
In olympic weightlifting survey data, shoulder and knee pain are the most common injuries reported. Given the high volume of loaded squatting during weight lifting, it’s natural that the knee and patellofemoral joint takes stress during training and can get painful from time to time.
Far and away the most common type of knee pain treated in physical therapy outpatient clinics is patellofemoral pain syndrome (Click the link for a behemoth article series on this issue). This is consistently the biggest issue I see with weightlifters. Other common injuries at the knee (although not as prevalent) are patellar / quadriceps tendinopathy, meniscus injury, IT band pathology and (far less common) major ligament injury (like the ACL).
Now, before you start rehabilitating your own knee please make sure you’ve gotten your knee checked out by a physician, therapist or chiropractor to make sure you’re a candidate for therapy and that there isn’t something more serious going on that needs a different treatment.
That being said, there are generally a few specific guidelines to keep in mind when rehabilitating. I’ve put them into 5 categories below. If you follow these 5 guidelines you’ll be well on your way back to training pain free:
- Modify training and lifestyle activities to respect the joint’s limited capacity after an injury
- Identify and correct soft tissue and mobility limitations in the ankle, quads, glutes and hip flexors
- Reduce pain levels using soft tissue techniques like foam rollers
- Start gradually loading the hip and knee through a progressive strengthening program
- Correct any movement faults through biofeedback and verbal cues
1: Modify training and lifestyle activities to respect the joint’s limited capacity after an injury
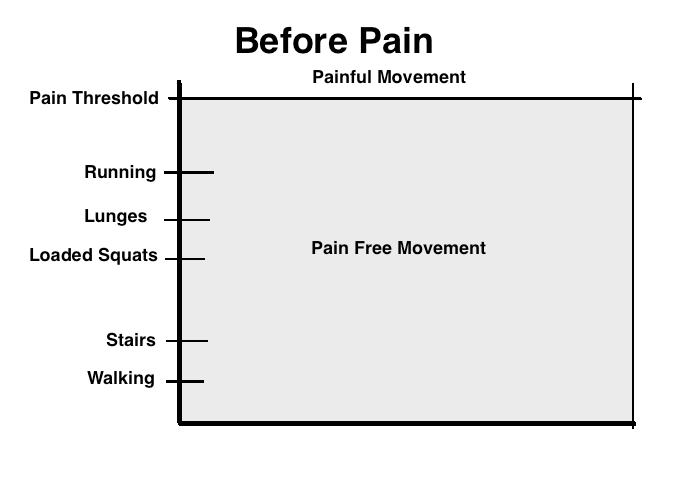
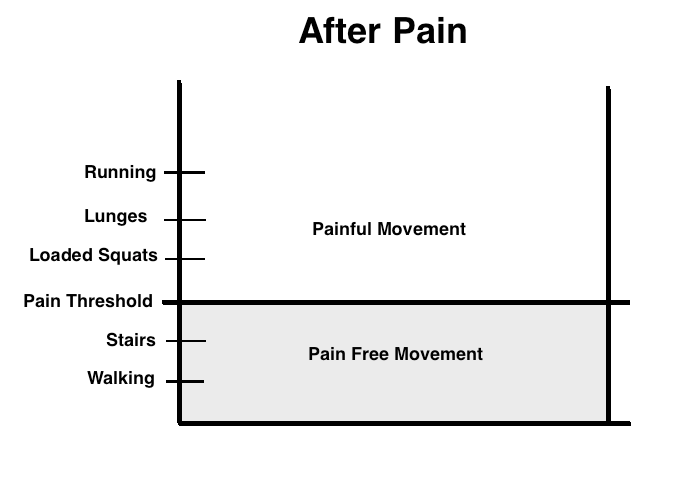
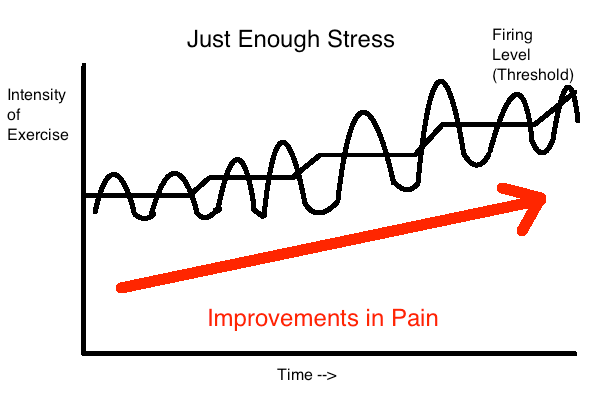
After an injury to the knee, the joint’s capacity is limited. We can’t handle activities that we could handle before without pain. Activities like heavy squats, going down stairs and running can be too painful to attempt. What’s important to understand is that pain is a natural and normal protective response our brains produce to make sure we don’t do anything stupid and risk further injury in the future. It also serves as a guide as we slowly get out of pain and back to training (more on this later). Check out the images below for a graphical representation of what our knees might be able to handle with and without pain both before and then after an injury:
Now, the first step after we have an injury is to unload the area. This means staying away from aggravating activities in the gym as well as aggravating lifestyle activities. This could mean temporarily eliminating things like:
- Prolonged sitting (prolonged drives, flights, long work hours sitting)
- Stair climbing
- Manual labor that irritates the knee
- Squatting and kneeling
It also means making some major modifications to aggravating exercises in the gym. We’re going to want to temporarily eliminate or modify movements like:
- Squatting
- Olympic lifts (cleans, snatch)
- Lunging
- Step-ups
- Pistols
- Running
- Jumping
- Double unders
- Jerks / push press (the dip and catch portion of the lifts)
- Any other knee intensive exercise
My general rule for modifying is that any movement that creates more than a 3/10 pain (on a 0-10 pain scale) during, after or the day following training needs to be modified. In reality I’d like training to be as pain free as possible but sometimes this isn’t possible for really irritated knees. Obviously this is going to be different from person to person and it will take some experimentation to get right.
I know this is tough to hear for someone who absolutely loves to lift, but it’s important for long term success during rehabilitation and if we skip this step we could be setting ourselves up for a long term failure and frequent future exacerbations.
Now, patellofemoral pain syndrome is an interesting disorder because it doesn’t generally get better if we don’t have a period of unloading or if we don’t load the joint adequately. In other words, if we don’t find the correct dosage of exercise and apply this in a progressive fashion over time we could have knee pain indefinitely (for years without resolution). Other disorders such as patellar tendinopathy are similar. The key is to unload first and then progressively load over the course of time.
We use pain as a guideline for loading the knee joint. Not enough stress may not get the effect we want, too much stress and we go backwards. Therefore we want to keep pain levels minimal when training, but having small amounts of pain is not only normal but can be a sign that we’re applying the right amount of stress to the joint. We’ll touch on how much pain is acceptable and what isn’t later in the program.
As we progress over time we have to challenge our knees further. What this also means is that as our knees improve we can slowly start leaking exercises back into our exercise program that were previously too painful. My general recommendations when introducing exercises back into training.
- Pain should be minimal or at or below a 3/10 on a 0-10 pain scale during exercise
- Pain levels should return to baseline following exercise as well as the following day
- Pain and function should be improving on a monthly basis
- Exercises should be introduced with low volume and intensity initially (low loads, sets, reps, days / week)
So after an initial period of unloading we can try re-introducing low level jumping exercises like jump rope. If we tolerate jump rope following the guidelines above, then good news. If not then take them back out of training for a few weeks and re-try later. Continue this process until you’ve gotten back to all previously offending exercises.
2: Identify and correct soft tissue and mobility limitations in the ankle, quads, glutes and hip flexors
Stiffness in the quads, glutes and hip flexors can contribute to knee pain and if identified should be corrected. Correcting a limited thomas and Ober’s test correlates with successful outcomes in patellofemoral pain syndrome. In those with patellar tendinopathy, strengthening combined with correcting quadriceps and hamstrings length limitations improves outcomes more when compared to strengthening alone. You can use the thomas test and Ober’s test to assess for mobility limitations:
Once you’ve found restrictions, spend some time correcting them with these mobilizations:
Limited ankle mobility can lead to poor movement when returning back to squatting movements and increase stress within the knee joint.
We’ll want to screen for limited ankle mobility. Use this assessment below to check for limited ankle dorsiflexion:
If you find some limitations, here are some corrections:
These mobility drills can be started immediately after starting rehabilitation and should be continued throughout.
3: Reduce pain levels using soft tissue techniques like foam rollers
Foam rolling has been shown to improve something called pressure pain threshold (PPT). PPT is basically the amount of pressure the body can handle before pain is experienced. After foam rolling your pain threshold (for pressure) improves. Foam rolling may directly improve pain in the knee through this mechanism. Utilize the foam rolling techniques in the videos above to decrease pain. Just keep in mind that these improvements in pain are generally short term and won’t provide a long term solution for your pain.
This is also where a skilled therapist can come into play utilizing soft tissue techniques like massage, instrument assisted soft tissue work and dry needling. Patellar mobilizations, taping techniques of the knee and foot as well as orthotics fit into this bucket as well.
4: Start gradually loading the hip and knee through a progressive strengthening program
Far and away the most evidence based treatment for knee pain is going to be strengthening. We definitely need to address strengthening as part of our plan. Strengthening programs should be progressive in nature to obey the gradual healing process of the joint as described in step #1.
Strengthening programs are also generally somewhere between 8-12 weeks in duration in our medical literature (depending on the study you read). Just keep in mind that depending on the type and severity of the injury and how intense of a program you want to get back into, this could be shorter or longer. These programs are also generally performed 3 times per week for patellofemoral pain syndrome and more frequently in patellar tendinopathy (twice daily to every other day).
Some key points to help decide which exercises to choose:
- More quadriceps contraction generally increases stress on the knee (higher loads, more upright torso while squatting)
- Greater depth of squatting increases stress on the knee
- Hip dominant movements (deadlifts) stress the knee joint less then knee dominant exercises (squatting)
- Faster movements increase stress within the joint (catching a heavy clean quickly in a deep squat vs. slowly descending into the bottom of a squat)
With this information we can create a program that intensifies over time. A progressive exercise program should:
- Slowly progress load over time
- Slowly progress depth of squatting over time
- Begin with hip dominant movements and progress to knee dominant movements
- Begin with slower tempo lifting and progress to fast and explosive lifts
Here is a phased strength program to help give you an idea of how these exercises can be progressed over time:
Also keep in mind that your exercise program should work to progress back to the specific demands of your training program. This means using the above principles to slowly return back to squatting and olympic lifting. I’ll outline a program like this at the end of this article.
5: Correct any movement faults through biofeedback and verbal cues
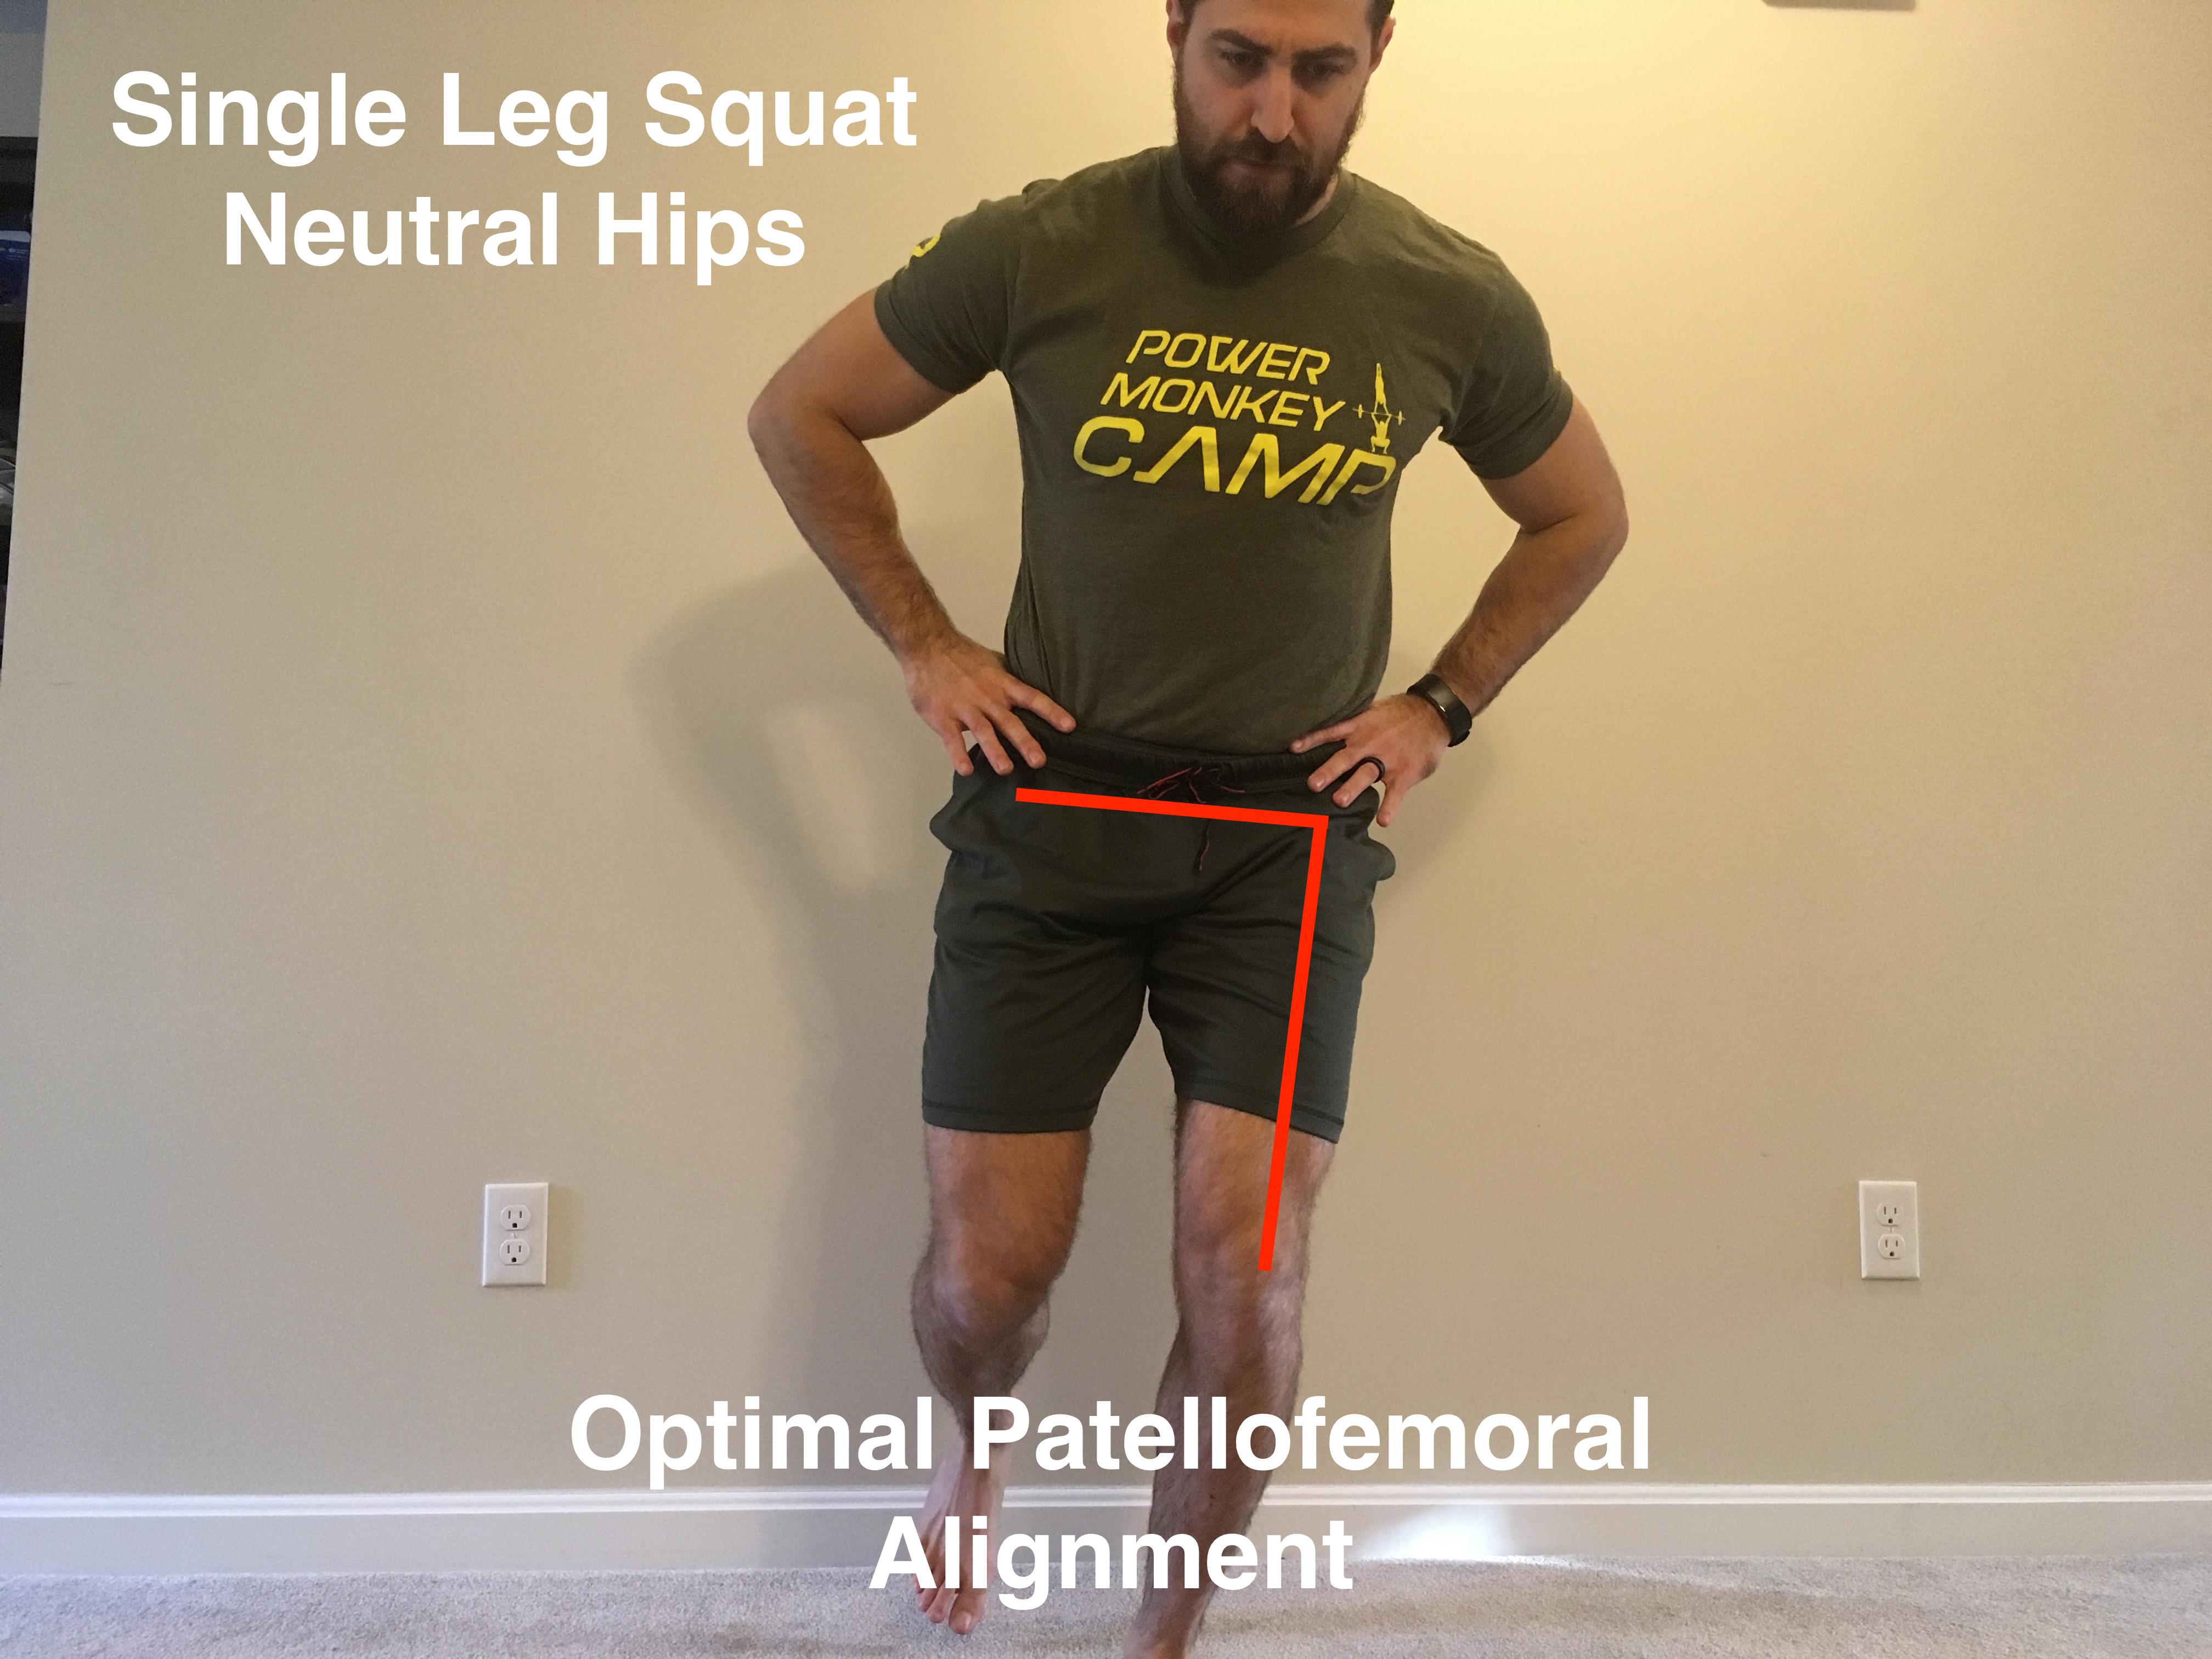
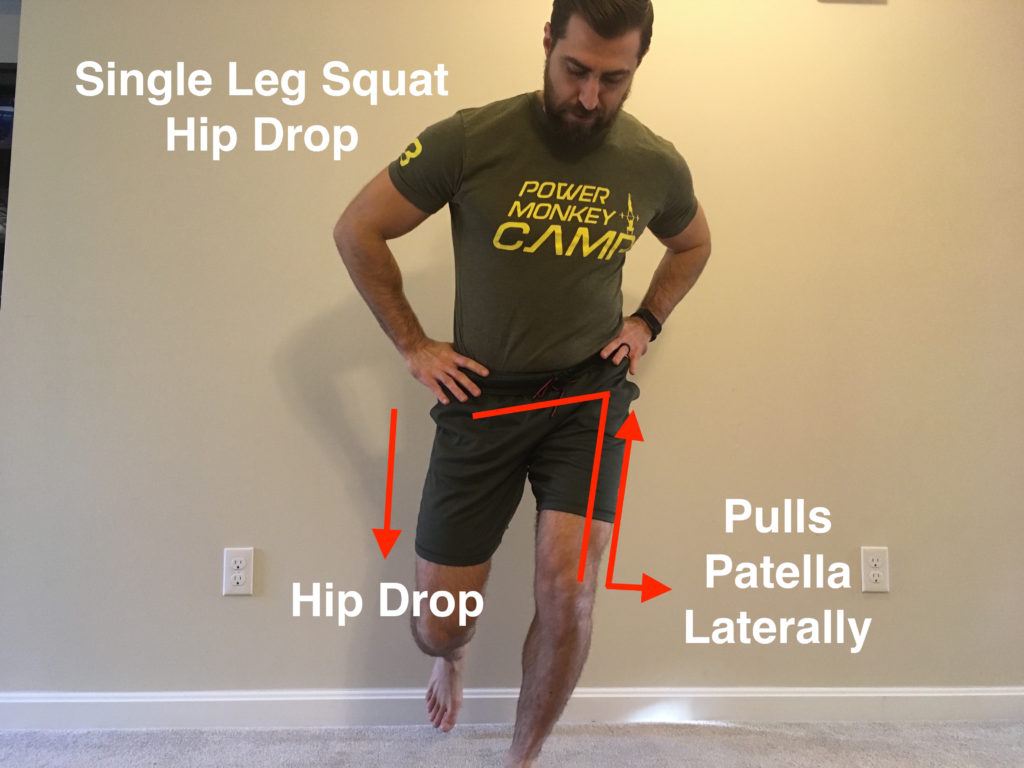
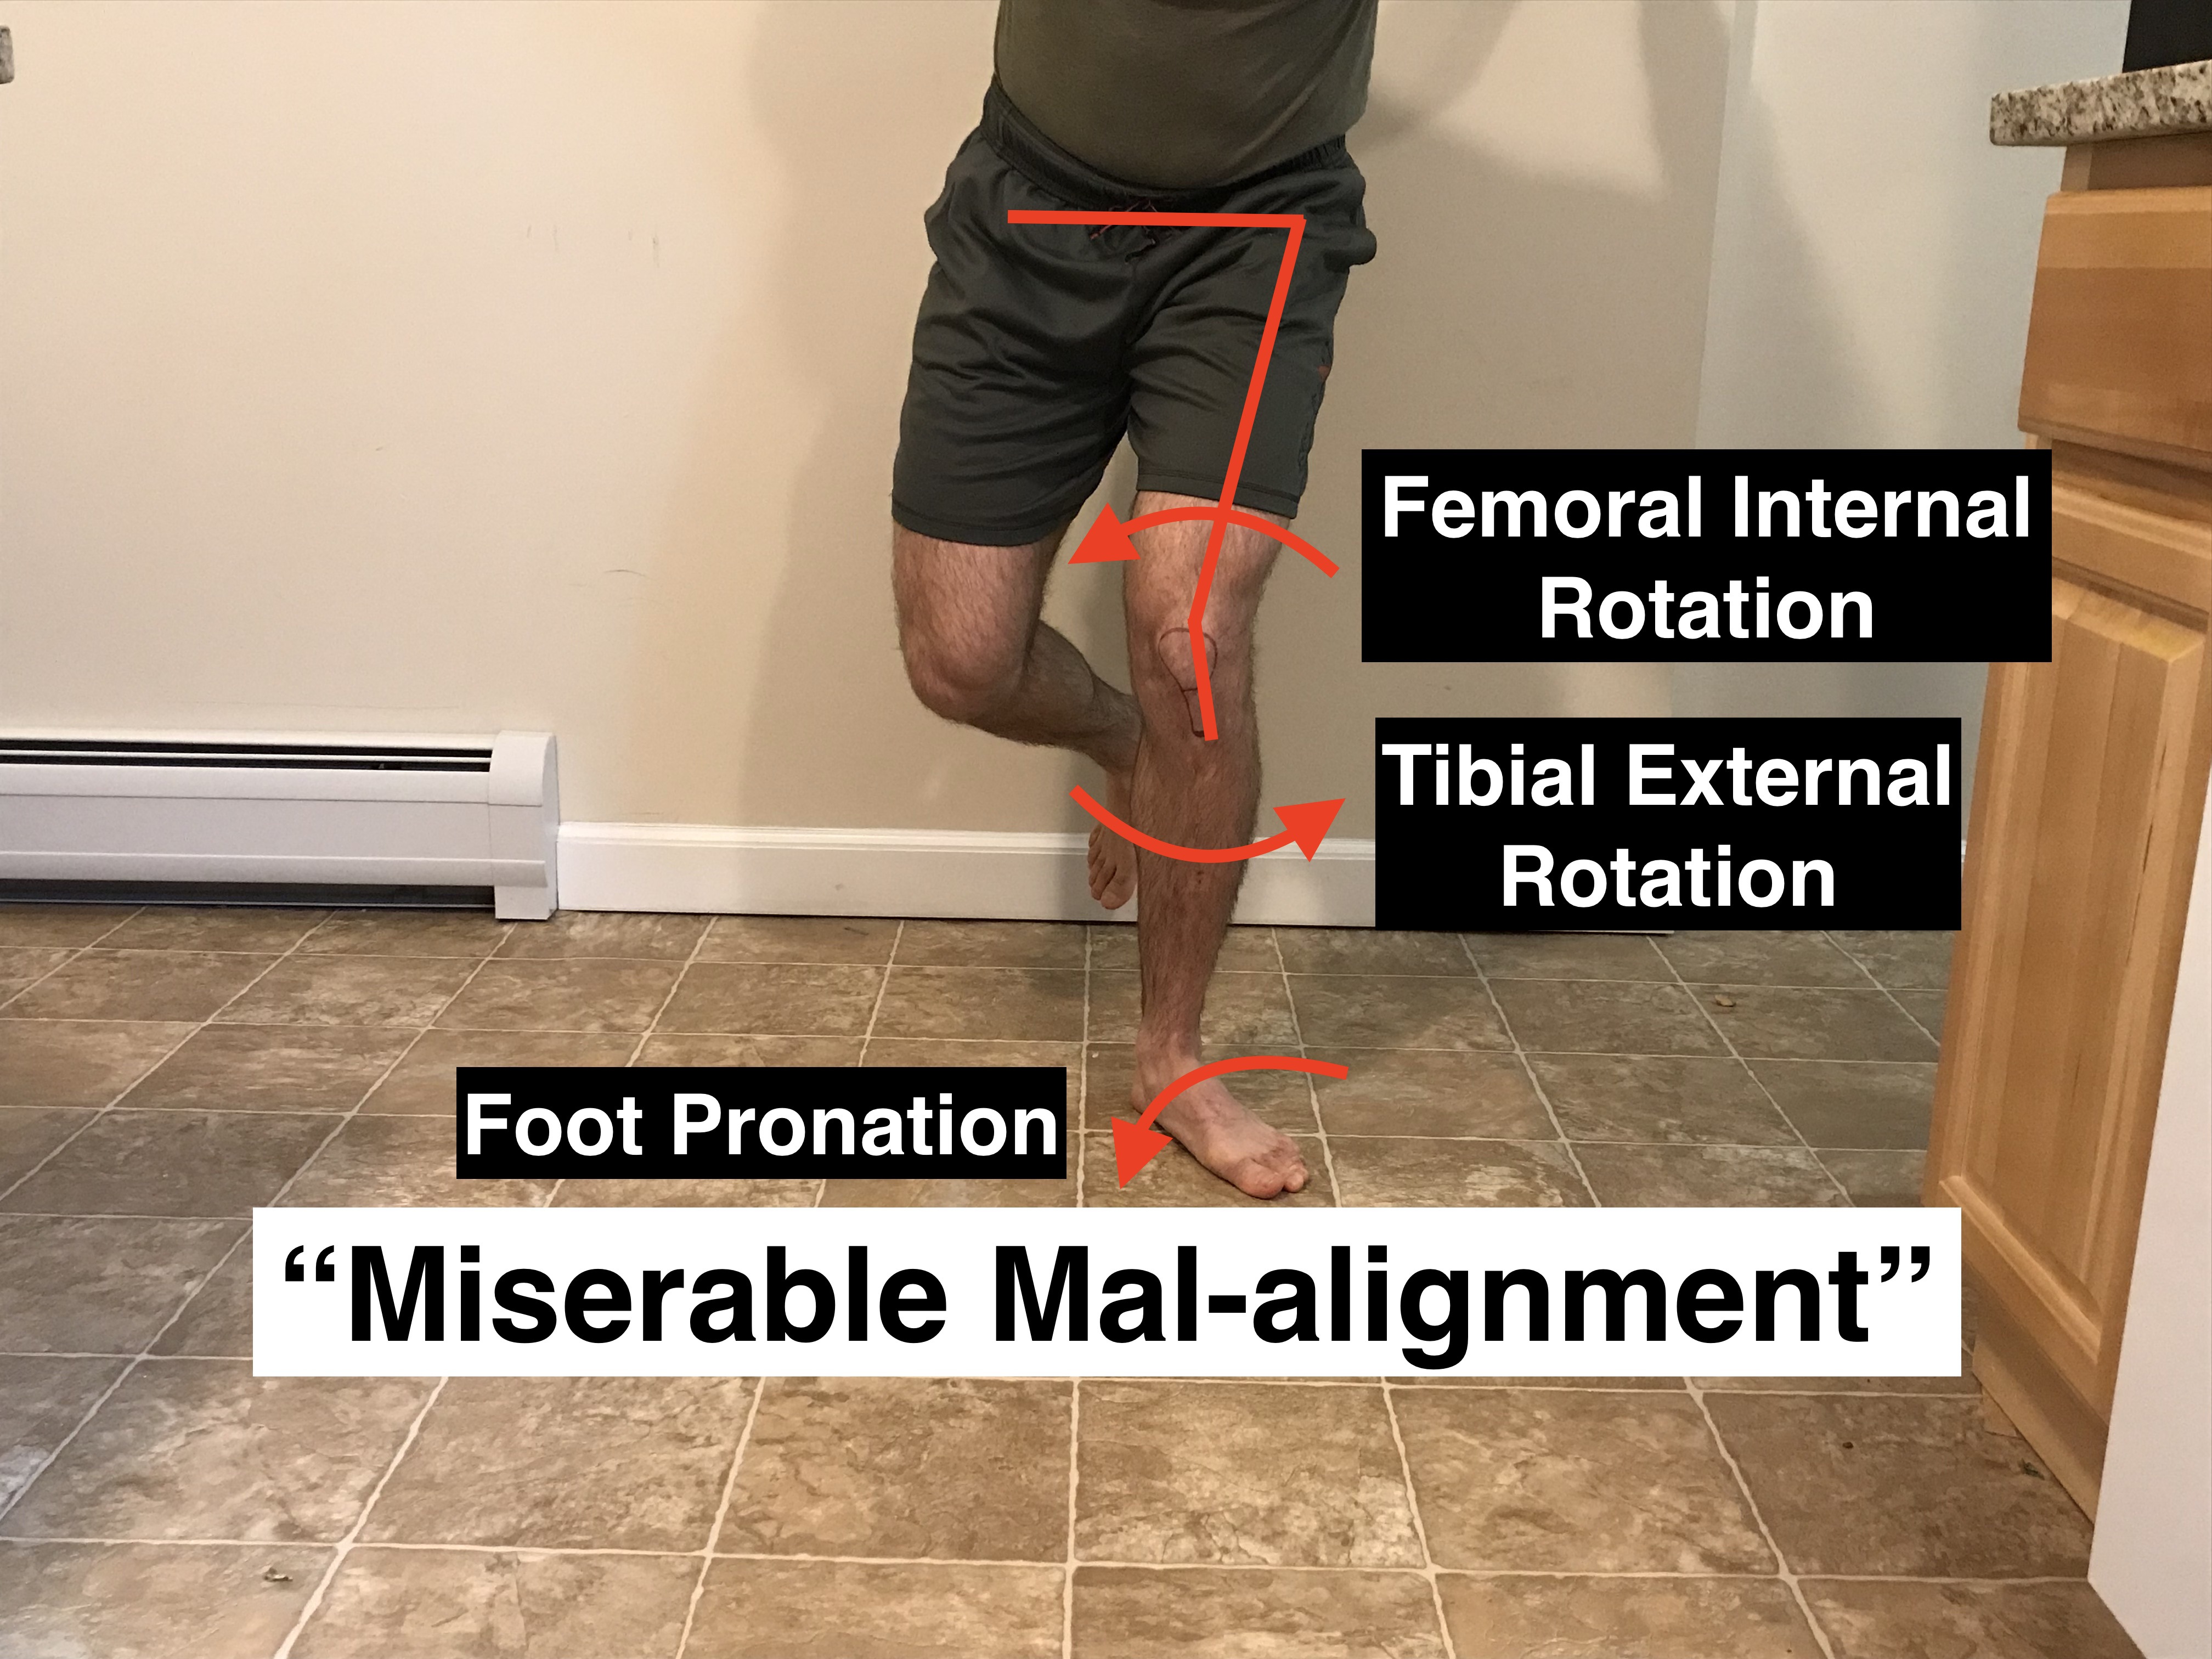
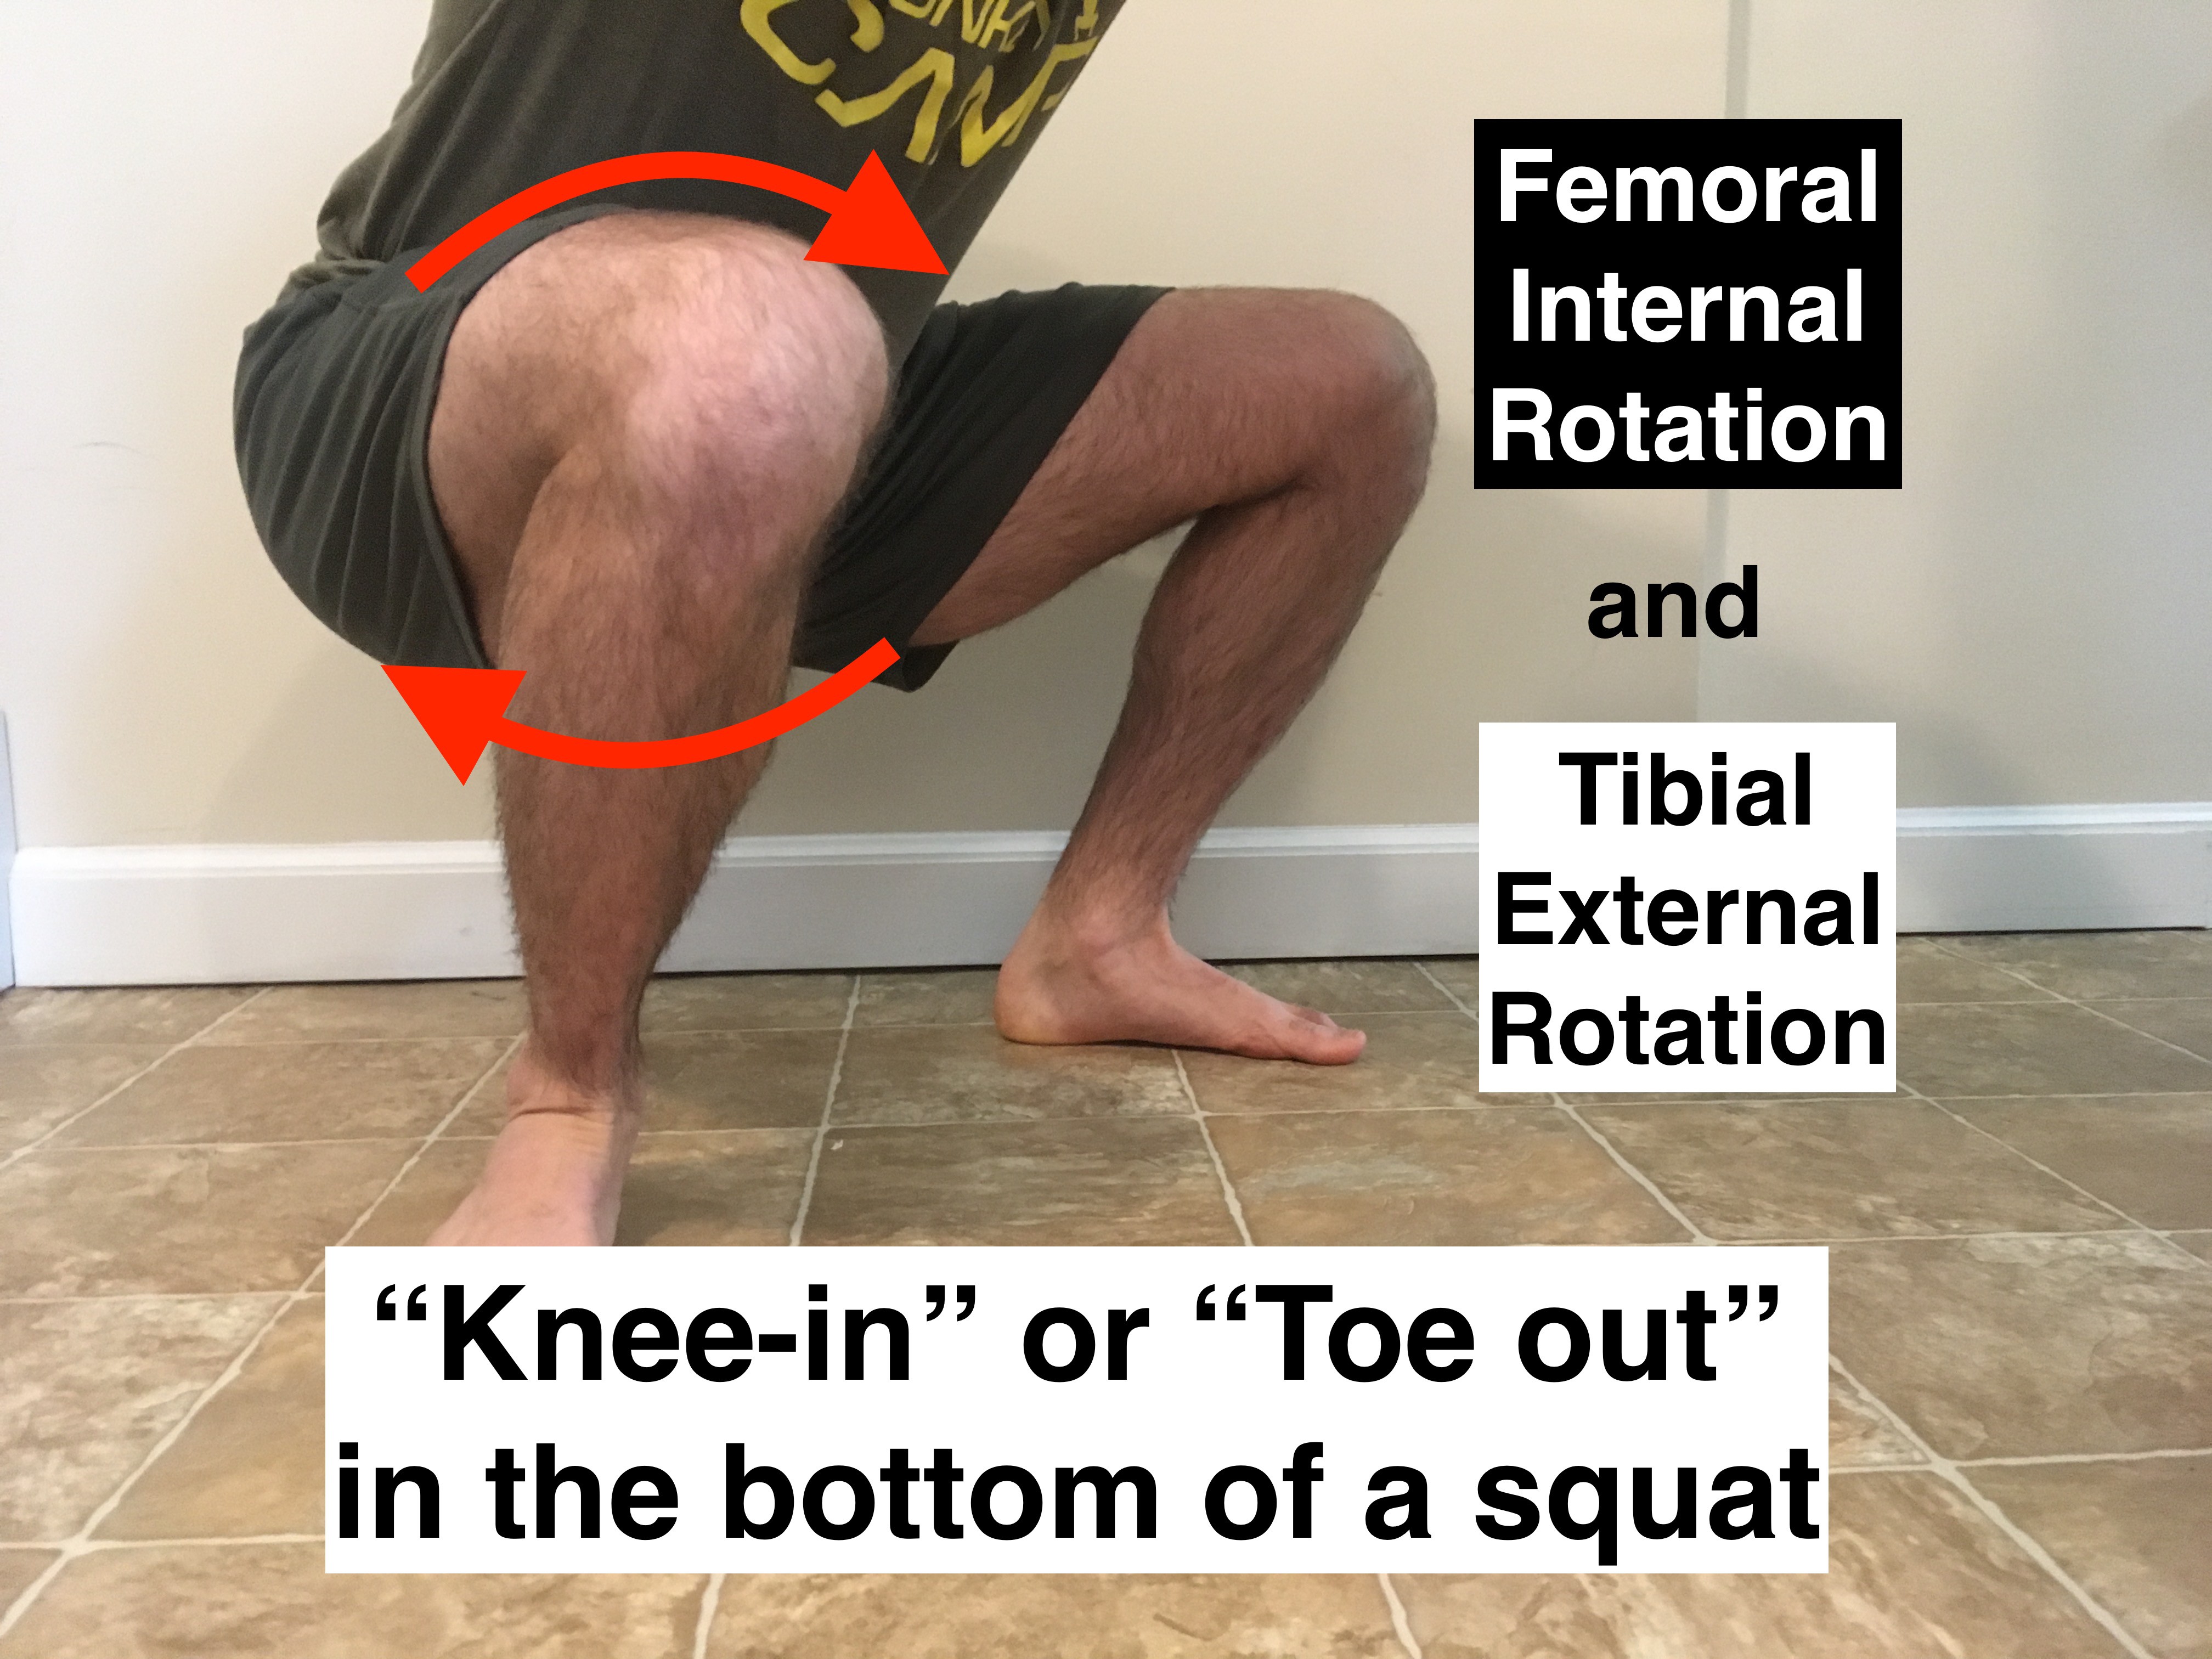
Certain single and double leg mechanics can increase stress within the knee joint. Once we’re progressing back to these movements we need to ensure we’re moving optimally. In the first image we can see an optimal single leg squat and the images further along show movement mechanics that place more stress within the knee.
A general rule of thumb is that we want the hips to remain level and the knee to line up with the 2nd toe of the foot during exercises. This increases surface area within the patellofemoral joint to dissipate stress. We want to keep these mechanics during lunges, step-ups, running, jumping, single leg squats and deadlifts.
The same issues can be seen during double leg exercises like squats and deadlifts. Just as with single leg exercises ensure that the knee remains aligned with the 2nd toe of the foot.
You can fix these issues by watching yourself lift in front of a mirror or by having a friend or coach video you and or give feedback on your mechanics while lifting. Just keep in mind that improving technique on one movement doesn’t tend to carry over to the next movement (i.e. fixing a single leg squat will not fix abnormal running mechanics). You’ll want to have a strategy to fix all movements.
Side Note: Keep in mind that some of these strategies (hip drop, valgus etc.) occur from pain or weakness at the knee joint (mostly the quads). If we start forcing motion at the knee as opposed to the hip we’ll INCREASE stress there. This is good as long as we are not driving through too much pain (use the pain parameters we’ve discussed).
So now that we went over these principles to help get you out of pain, how does the program end up looking? Let’s put it all together.
Return to Weightlifting After Knee Pain Program
Week 0-2:
- Eliminate knee intensive activities
- Begin mobility program 3x per week
- Progress to the next phase when mostly pain free with daily activities (2-4 weeks)
Week 2-6:
- Slowly introduce strengthening beginning with hip dominant movements (Think deadlift and hip hinge variations) – 3x per week
- Reintroduce squatting – Beginning with more hip dominant squat variations with less knee flexion (more shallow squats, box squats etc.)
- Ensure proper biomechanics during lifting
- Begin phase 1 strength (from video above) – 3x per week
- Continue mobility program – 3x per week
Week 6-10:
- Progress squatting difficulty – More upright squat variations, more loading, greater depths (greater knee flexion angles)
- Introduce power olympic lift variations (limited squat depths)
- Introduce jerk dips
- Slowly re-introduce previously offending movements that are <3/10 pain level
- Progress to phase 2 strength (from video above)
- Continue mobility program 3x per week
Week 10-14:
- Build capacity in the bottom of a squat (tempo, pause reps, deep squats)
- Introduce full squat olympic lifting variations (sub maximal loads and speeds)
- Slowly re-introduce previously offending movements that are <3/10 pain level
- Progress to phase 3 strength (from video above)
- Continue mobility program 3x per week
Week 15+
- Slowly increase squatting volume: frequency, sets, reps, time under tension
- Slowly increase squat intensity: Loads, Rate of perceived exertion (RPE)
- Goal is to make your rehab program slowly start to look like your normal training program
So that’s it! Hopefully I helped you figure out how you can start getting back on your feet and back to training.
Still need some more help? If you’re looking for a completely done for you “step by step” guide to help you get out of knee pain and back to training then you’re in luck. The program is called “Ultimate Knee”
I’ve taken the guesswork out of finding the right amount of sets and reps and which exercises to use and which to avoid. It’s all 100% outlined. Consider it your roadmap to get out of pain and back to training.
Click HERE to Learn More and Get Instant Access
Kill that knee pain,
Dan Pope DPT, OCS, CSCS, CF L1
References:
- I cite over 60 articles in my article series of Patellofemoral Pain Syndrome and Patellar Tendinopathy. Click the respective links to find the citations!