
Updated 11/20/20
Is Kipping Bad for You?
Kipping is a bit of a controversial subject. Some people have fully embraced it as a skill that should be developed and others still believe it’s the devil incarnate releasing rotator cuff carnage throughout the fitness world.
I’ve been excited about kipping pull-ups for several years now (over a decade actually). As a physical therapist as well as a crossfit coach I’m very much concerned with keeping people safe and having them move well. Given all of the hub-bub about kipping pull-ups being dangerous I’ve spent the last several years formulating my thoughts on the subject and wanted to share them with you all.
Before we start, I think it’s important to understand my biases coming into this discussion. I’m a full-time physical therapist (working with a large patient population of crossfit athletes), former crossfit coach (6 total years), crossfit athlete (2x regional competitor) and on the staff of power monkey fitness (an elite gymnastics and olympic weightlifting continuing education company). I’ve also treated countless athletes with various shoulder injuries get back to kipping at the gym safely without pain.
With this perspective I have the unique opportunity to see how people get hurt, rehabilitate their injuries and more safely return them to their fitness. Working for power monkey fitness has allowed me to learn how to safely and efficiently coach and progress athletes through these movements. Coaching gymnastics at crossfit Verve gave me the opportunity to coach athletes on how to kip well and advance them to more challenging movements like pull-ups, toes to bar and muscle-up variations. As an athlete, I understand the desire to be able to perform kipping movements to be more competitive.
Let’s not kid ourselves, people get hurt when exercising sometimes. It’s an unfortunate fact of training. As a therapist I actively treat people who have gotten hurt while performing kipping movements. Despite this, I still coach and advocate for the movement. I think that the pros outweigh the cons and at the end of the day I see far more injuries coming from the basic barbell lifts then from kipping.
I just think that as coaches we have to be prepared for the large task of properly progressing your athletes toward kipping mastery. I’m as guilty as everyone else. I first saw Jason Khalipa’s video on youtube on how to teach kipping pull-ups and thought I had it all figured out. Although not a bad start, the video hardly scratched the surface of what it takes to build the movement. In this article I’ll attempt to give my best guide to assessing, building, coaching, progressing and programming kipping movements effectively.
Kipping Basics
Kipping is made up of 2 basic positions, the arch and hollow shown below in this video by Power Monkey Team Captain and Olympic Alternate Dave Durante:
Looks simple enough right? Trouble is, not everyone can get into these basic positions. As a coach it is our job to screen our athletes and see who can actually get into these positions properly. For the athletes who can’t we need a plan for improving these basic positions. The 2 movements we need to asses are the arch and the hollow.
We’ll assess these positions first on the floor. Here are the key points:
Hollow Hold
Key Points:
- Gentle sloping “C” position throughout
- Low back flat to the floor
- No broken angles
- Adequate lumbar and thoracic spine flexion (rounding)
- Adequate strength and endurance to maintain this position (10ish seconds)
- Note: If your athlete is shaking like a leaf during the assessment, chances they’ve got some work to do also
Honestly, it’s tough to tell what a good hollow position actually looks like. Coaches Colin Geraghty and Shane Defreitas from Power Monkey Fitness Camp share an excellent video to show the concept of a gradual “C” position of the body. If you have some athletes who can’t create this position on the bar, chances are you need to take a few steps back to work on the hollow and arch positions:
So when people have difficulty with positions, where do we start? Most athletes I see struggling with the hollow hold fall apart in 1 of 4 different areas which we need to be mindful of:
Why the Hollow is Off
1) Inadequate Mobility in the Spine
If your athlete has little to no flexion or rounding in their lumbar spine (lower back) then they’re going to have a heck of a time trying to hollow hold. Trouble is, a limitation in the ability to hold a hollow hold can come from a variety of things. To see if mobility is a limiting factor we use the child’s pose assessment:
Does the athlete have uniform flexion of the lumbar spine? If yes, then your athlete does not have a mobility problem and is dealing with either a motor control, strength issue or endurance issue. If the athlete does not have a uniform curve then it is safe to assume they’ve got a mobility issue to work on. Two easy exercises to work on this I’ve included below:
Cat - Cow
Rabbit’s Pose
2) Inadequate Motor Control
Motor control refers to the ability of an athlete to find the correct position we need for proper exercise execution. Once we have mobility cleared up, this is our next step. The movements we’re trying to promote are spinal flexion with pelvic posterior tilt. Again, coaches Colin Geraghty and Shane Defreitas from Power Monkey Fitness Camp share their favorite ways to coach the hollow position.
I also have success cueing my athletes to keep their low backs flat to the floor while simultaneously lifting the chest up. This usually gets them into the correct position. You can either cue this verbally or provide a tactile cue by placing your hand below the low back and asking them to push down.
Here is a quick little hollow progression you can use to help your athletes learn how to create and reinforce the hollow position:
3) Inadequate Strength
Some beginner or deconditioned athletes will also have difficulty with the absolute strength to acquire this position. If this is the case they’ll need to work on some regressions until they can hammer the hollow hold. For these athletes attempt to hollow with the arms at the side or with the knees and hips bent enough to maintain a correct position.
4) Inadequate Endurance
If an athlete simply can’t hold the hollow for 10 seconds, they just need to work on their endurance. Simple enough. You can use any combination of the above mentioned drills to work on this, ensuring the athlete can use proper technique during the movement.
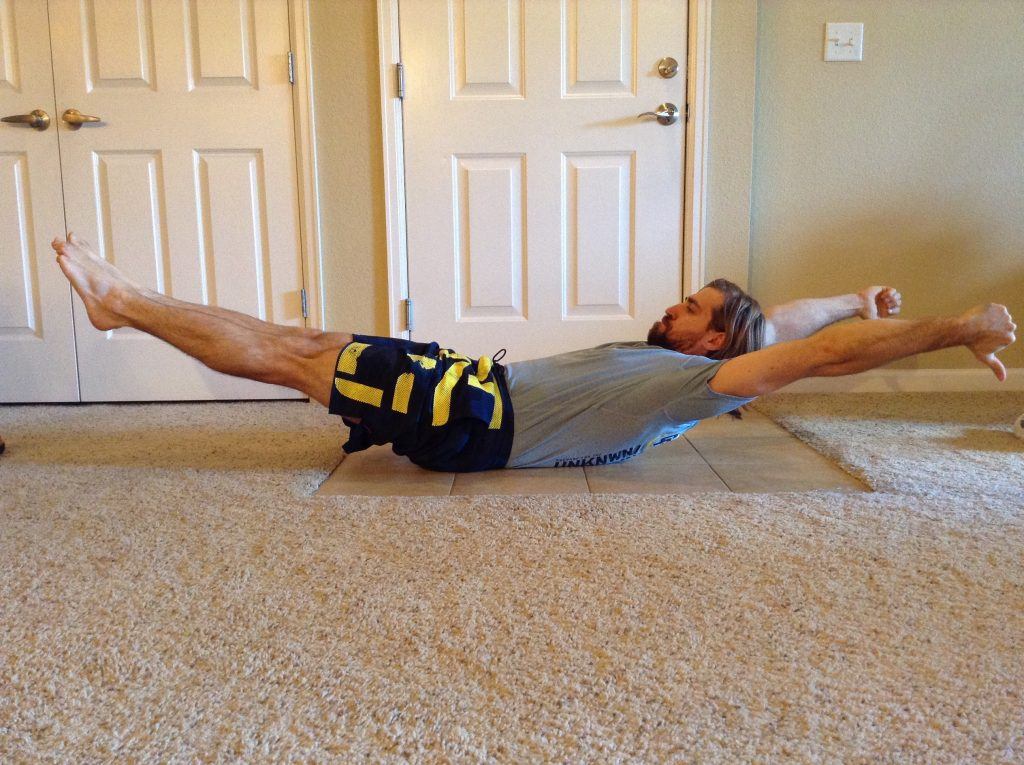
Arch Hold
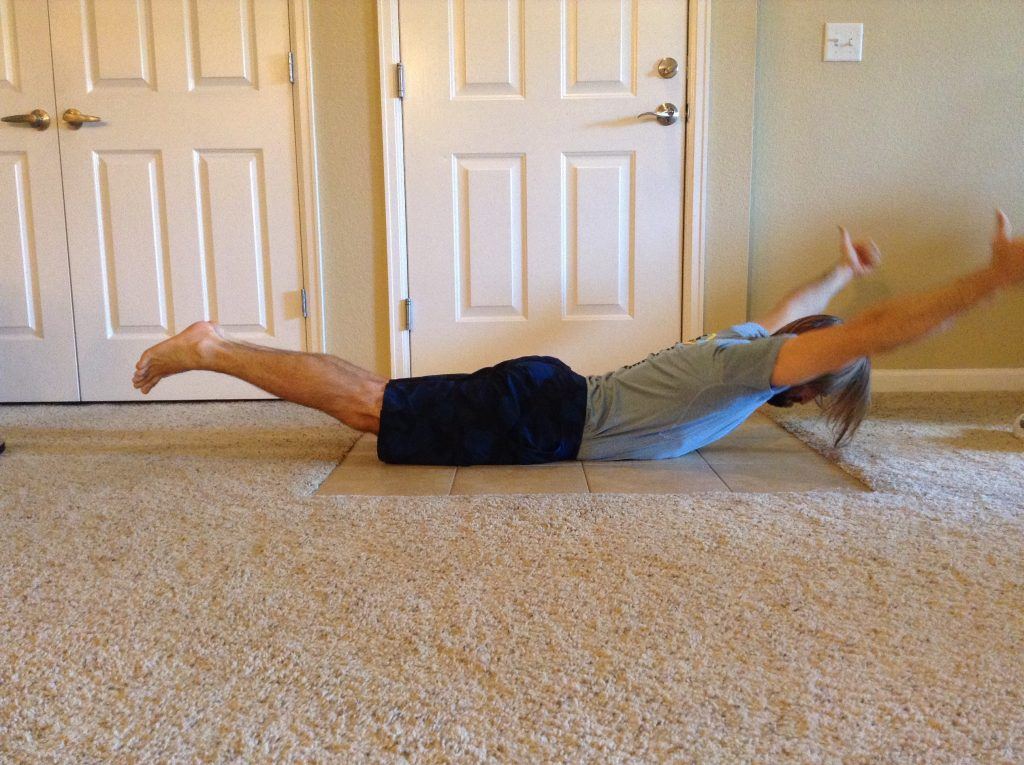
The arch is very similar to the hollow but in the opposite direction. Here are a few common things we’re looking for here:
- Gentle sloping “C” position throughout
- Adequate shoulder range of motion
- Adequate motion from the thoracic spine
- No excessive lumbar extension
- Adequate hip extension
- Feet together
- Hold 10ish seconds
Why the Arch is Off
Most athletes I see struggling with the arch hold fall apart in 1 of 4 different areas:
1) Inadequate Mobility in the Thoracic Spine and Shoulder
If you can’t get your arms overhead well, then your arch is going to suffer and along with it kipping performance and shoulder health. The other issue with kipping combined with overhead restrictions is compensation. If overhead motion is limited during kipping then your body will attempt to produce momentum elsewhere, generally the lumbar spine. Too much motion anywhere is not desirable from a technique perspective and increased lumbar spine motion may lead to some low back issues over time in some athletes. Below I outline a simple way to assess overhead mobility and outline some of my favorite mobilizations to improve range of motion.
Do you have a nice uniform thoracic spine curve and adequate overhead motion? If not, you’ve got some work to do.
2) Inadequate Mobility in the Hip (Hip Extension)
Two very common errors in the arch are the feet coming apart and having excessive motion in the lower back. We already spoke about how having restrictions in the shoulders and thoracic spine will cause this. What will also cause this is lacking hip extension. Another common fault you’ll see with hip extension limitation is the feet coming apart in the backswing (Just keep in mind that these errors are not always mobility issues, sometimes they’re motor control, strength or endurance issues as explained in the hollow segment above). If you start seeing these faults in your athletes then it raises a flag that we need to change something. First we assess for mobility limitations.
Is the knee dropping easily below the hip? If not you’ve got a hip extension mobility issue to address. Just keep in mind that once you clear up mobility limitations they need to be reinforced with motor control drills to ensure you’ll use that new motion during the arch.
3) Inadequate Motor Control
Just as in the hollow section above, we can have motor control issues during the arch. Once we’ve improved mobility now we need to learn how to use all of that motion, time our muscles accordingly and basically learn what the proper position feels and looks like when done properly. Here’s my favorite way to teach positioning for the arch:
4) Inadequate Strength and Endurance
Since we already discussed the concepts of strength and endurance in the hollow section I’ve decided to lump them together in the arch section. Just keep in mind that strength issues arise when an athlete has trouble performing the first few reps and endurance issues are seen when technique breaks down throughout the course of the set.
This series is a work in progress! Stay tuned for next week we'll be going over building strength and technique...
Kipping Since 1985,